Thursday, November 20, 2014

Happy Turkey Day!

The Cutting Cafe team is designing with any of these 3 Thanksgiving themed sets this week:
Happy Thanksgiving Word Shaped Card Template 
Turkey Shaped Card 
Thanksgiving Day Printable Stamp Set 

I have tried my hand at Zentangle before and it just looked awful. I thought the turkey in the Thanksgiving Day Printable Stamp Set would be the perfect image to try my hand at it again. I love doodling and have been so inspired by my friend Michelle's zentangle projects, that I just had to not give up at it. Ü

So here is my zentangle Thanksgiving Turkey.

Be sure to visit the Cutting Cafe Blog on the 7th and 21st of every month to see the design team's projects in which you can leave a comment to be entered into a drawing to win 3 FREE sets of your choice from the online store.

Monday, November 17, 2014

Pinned It Made It Monday Week 46

We picked all our apples right before the BIG freeze and snow, so have lots of apples waiting to be worked. I had pinned a recipe for Apple Pie Bread Pudding and decided as cold as it was, this would be a good way to warm up the oven, use up some apples (very few though LOL), and try a new recipe.


I served this warm with some cream and homemade caramel sauce (forgot to take a picture before Ü).

And here is the recipe via Katie's Cucina

Apple Pie Bread Pudding
Prep Time: 35 minutes
Cook Time: 60 minutes
Total Time: 1 hour, 35 minutes
Yield: 8-10 servings
Ingredients
  • 2 teaspoons Cinnamon
  • 3/4 teaspoon Nutmeg
  • 1/4 teaspoon Allspice
  • 2 cups Granulated Sugar, separated
  • 4 cups Whole Milk
  • 6 Eggs
  • 1 large loaf of crusty Bread (Italian or Country)
  • 5 small Apples, or 3 medium Apples
  • 1 tablespoon Lemon Juice
  • 4 cups hot tap water
Directions
  1. Combine the Cinnamon, Nutmeg and Allspice and set aside. Cut the Bread into inch-sized cubes and set aside.
  2. In a medium saucepan, scald the Whole Milk but do not bring it to a boil. While the Milk is heating, crack the Eggs into a large bowl and whisk vigorously with 1 & 1/2 cups of Granulated sugar.
  3. Once the Milk is warm, slowly pour into the Egg and Sugar mixture while whisking constantly (called Tempering, so the Eggs don't curdle/scramble). Once all the Milk is added, whisk in 1 & 1/2 teaspoons of the homemade apple pie Spice Mix.
  4. Place all the bread into the large bowl so it can soak up the mixture. You can toss it with a spoon and press down to make sure all the bread touches liquid. Leave it to "soak" for 30 minutes.
  5. Heat the oven to 300F. Wash and dice the Apples into 1/2 inch cubes. I prefer the skin on for an added texture, but you can peel them if you do not like the skin. Place the apples in a bowl and add the Lemon Juice, the rest of the Spice Mix and stir until the apples are completely coated.
  6. Using a 2.5 quart Corningware or deep casserole dish (or if you prefer, individual portioned dishes) layer the soaked Bread and the Apple Mixture in 5 layers, beginning and ending with the Bread.
  7. One of the most important steps when making bread pudding is to use a water bath, or Bain Marie. Place a large dish or pan (big enough to fit the casserole dish and about 4 cups of water) on the rack in the middle of your oven. Place the casserole dish inside and then add the water - this is the easiest way so you don't create a big mess by moving the already full water bath into to oven.
  8. Cook for 45-55 minutes. The top will look slightly crisp and the bread should be moist, but cake-like with no excess liquid around the edges. Very carefully, and if you can, take the bread pudding out of the water bath and let it cool slightly before eating. If you can't grab the casserole dish, take both containers out of the oven and let the water cool, until you can get the casserole out of the water bath. Again, please be careful, because the water bath is extremely hot!
  9. Best served warm with either vanilla ice cream or homemade Creme Anglaise
Notes
Original Recipe from Love and Confections

**my note: the recipe above did not say what to do with the 1/2 cup of sugar left over. I sprinkled about 1/2 of that on top of the bread pudding and it gave it a nice sugary, crispy crust. I'm thinking that it is probably suppose to be tossed with the apple, spice, lemon juice mixture.

Friday, November 14, 2014

Frugal Friday 11-14-14

*rec'd from 2 different people free sample for Jamberry nails

*downloaded free files from MyScrapChick

*a friend's brother had extra tickets to Ne. Volleyball game...VIP seats! Ride was free, game was free and VIP meal at the Devaney Center FREE! Awesome experience and we won, so even better!

*2.5 lb bags of corn candy for only $1. Scored 10 of these. Some to use for our ladies night out, some for DH and the kids and some to make homemade Butterfinger Candy. The funny thing is I had my SIL pick them up for me and I was trying to visualize what a 2.5 lb bag would look like. Oh my! They are huge! LOL

*2 free beef jerky package samples for DH and I at Walmart

*canned vegetables for 25¢

*whole turkey for 88¢/lb

*6¢ off per gallon using HyVee fuel saver points

*expensive name brand gallon of milk for 2.99

*lb butter 2.50

*finished the fooled you peppers from the garden. They really lasted long in the refrigerator

*used 40% off coupon at Hobby Lobby for blades for my paper trimmer

*also took advantage of 50% off fall items for plates for Thanksgiving and printed cello bags I needed for next week's ladies night out

*Betty Crocker vanilla frosting for 90¢. Had to buy two. I like this frosting for sugar cookies.

*free e-books from Blogging for Books

*free e-books from Amazon

*earned $35 in swagbucks

Blog Hop with Jen Goode/Church Fall Banquet

Today the Tombow Design Team is hopping with Guest Designer Jen Goode.

I am sharing some things I made for a recent fall banquet held at our church. The theme for the banquet was Refresh & Rejuvenate. I created 19 of these for round table center pieces. I was asked if I could do it as inexpensive as possible and I was able to.


The jars were free...our canning jars. I was able to bring them home and we will use them again. The "flowers" are just weeds. I went ditch hunting by our place and cut several different kinds of textured grasses/weeds.

The burlap on the jars were left over from my son and DIL's wedding. It is held together in the back with Power Tabs. The ribbon tied around it is by May Arts and from a roll I won from one of their contests.

The flag idea I got from Pinterest & Etsy. I have seen these fun flags around made from fabric, designer paper, Washi tape, etc. I cut and sewed the flags from fabric to give more color to the jar and then used Xtreme Adhesive along the skewer (97¢ for 100 at Walmart) at the top to hold it in place.

Here are all the other colored flags I made. I tea dyed paper doilies which were left over from B & K's wedding as well. Oh and the wood slice is also from what I used to decorate tables at their rehearsal supper.

I also got this twig holder idea from Pinterest. I went twig hunting in our yard and cut them to length and then using 1/2 Power Tab adhered them together on the ends. I typed "Replenish and Rejuvenate" on the computer and then hand drew the leafy image onto each card with the Mono Twin Permanent Marker. I cut and added a little color into the leaves with a Dual Brush Pen 026 Yellow Gold from the new Muted Set by just "smooshing" the marker into the leaf drawn.

And finally these pumpkins. I saw the idea I think first on Martha Stewarts website a few years back. The accordian circles were to just sit on top of each other (glued), but that didn't make them very tall, so  I added a Foam Tab in between each layer. Just in case  you are wondering...that was 133 accordian circles I made by hand. All the paper used was what I already had on hand. I added a stick at the top and hand cut 2 leaves from felt and glued and then adhered a raffia bow.

As with all our guest designer hops, there is a prize being offered.


The Prize includes:
In order to be qualified to win this amazing PRIZE, PLEASE comment on each of the designers projects. Tombow will announce a winner Monday 10/17.

Now it's time to head over to the very talented Melissa Cash's Blog.

The Lineup for this hop is:

Thursday, November 13, 2014

BFB Daughter of Highland Hall

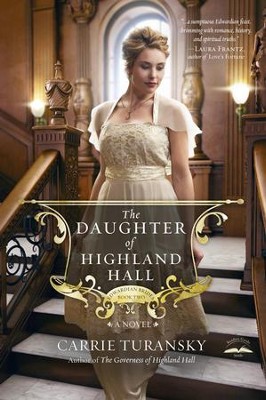
The Daughter of Highland Hall - eBook   -     By: Carrie Turansky
I rec'd another e-book from Blogging for Books. This one was the second in the Edwardian Brides Series called Daughter of Highland Hall by Carrie Turansky. I loved her first book that I rec'd from BFB and was excited when this next one was available.

This story is about Katherine (Kate) Ramsey. She is coming of age and is ready for London's social season. Just about everything that could go wrong does for her coming out, but God is always in control and knows best. This was a fun read and I can't wait for the next book in the series that will feature her younger sister.

Monday, November 10, 2014

Pinned It Made It Monday Week 45

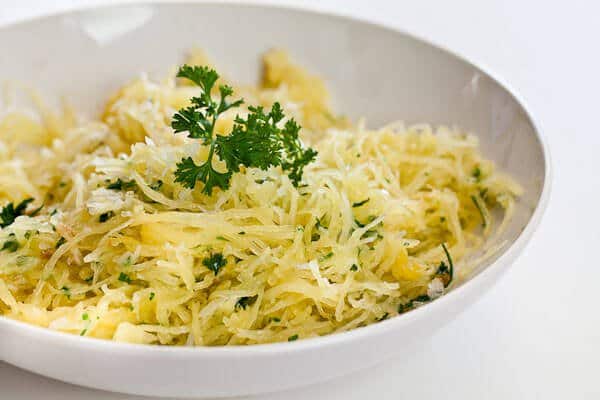
A couple of weeks ago I had purchased a spaghetti squash at Walmart for 49¢/lb (via price match, it was not that cheap normally) and oh how I wish I would have bought a bunch of them. I have only had spaghetti squash from the garden, so wasn't sure what one would be like from a store.

I baked it for an hour and then with 1/2 made THIS recipe from Pinterest that I forgot to take a picture of and then for supper made THIS recipe (Skinny Spaghetti Squash Alfredo) from Pinterest. Both were absolutely delicious! I used garlic from our garden, so that was fun as well.


Skinny Spaghetti Squash Alfredo
via Comfort Cooking

Yield: Makes 2 large servings or 4 side dish servings

Ingredients:

1 medium-sized spaghetti squash
1 Tablespoon butter
3 cloves of garlic, finely minced
2 Tablespoons flour
1 cup milk (I used fat-free)
1 Tablespoon cream cheese or Neufchatel cheese
1 cup freshly grated Parmesan cheese, plus 2 Tablespoons extra for topping
1/4 teaspoon kosher salt
1/8 teaspoon freshly ground pepper
Crushed red pepper flakes and fresh parsley, for optional garnish **I didn't do this**

Directions:

Preheat oven to 350 degrees F.
First, prep the squash. Cut spaghetti squash in half using a large sharp knife, scoop out the seeds and place cut side down on a rimmed baking sheet covered with water. Bake until tender, about an hour.
As an alternate way of baking: Poke a few holes deep into the whole squash with a paring knife. Bake for 60 minutes, remove from the oven and let rest for 10 to 20 minutes before slicing in half with a large serrated knife. Scoop out the seedy inside leaving the spaghetti strands.
Once squash is cooked, use a fork to gently scrape the “spaghetti” strands into the center.
For the sauce, melt butter in a small pot over medium-low heat. Once hot, add garlic and sauté for 1-2 minutes. Whisk in flour, cooking for another minute while stirring. Whisk in milk until no lumps remain. Once hot, add cream cheese and stir until smooth. Remove from the heat. Stir in Parmesan, salt and pepper.
Spoon sauce equally into each spaghetti squash half. Gently pull up the spaghetti strands to coat as much as possible with the sauce. Top with extra Parmesan and place under the broiler of your oven for 2-3 minutes, or until golden and bubbly.
Top each half with a pinch of red pepper flakes and fresh chopped parsley, if desired. Serve hot.

Adapted from Food Doodles

and here is the recipe I didn't get a picture of:

Baked Spaghetti Squash with Garlic and Butter

Servings: 6 Prep Time: 5 Cook Time: 60

photo via steamykitchen

I tend to under-bake the spaghetti squash just a bit, so it still retains just a slight crunch. Baking time really depends on how big your squash is - try to get the smallest one, especially if you’re only feeding 4 people. It’s ready if you can pierce the squash with a paring knife with little resistance. If you’re a garlic love, don’t be shy - use more!

Alternatively, microwave the whole squash for 2-4 minutes (to soften enough to cut lengthwise). Place squash cut-side down on baking sheet and roast for 30 minutes until tender.

Ingredients:

1 small spaghetti squash (about 3-4 pounds)2 tablespoons butter2 cloves garlic, finely minced1/4 cup finely minced parsley (or basil)1/2 teaspoon salt (or to taste)1/4 cup shredded parmesan cheese

Directions:

1. Preheat oven to 375°. Pierce squash a few times with sharp paring knife (to let steam escape). Bake spaghetti squash for 60 minutes, or until a paring knife pierces easily through skin with little resistance. Let squash cool for 10 minutes.

2. Cut squash in half, lengthwise. Use a fork to remove and discard the seeds. Continue using fork to scrape the squash to get long, lovely strands. If the squash seem difficult to scrape, return the squash to bake for an additional 10 minutes.

3. Heat a large saute pan with the butter and the garlic over medium-low heat. When garlic becomes fragrant, add parsley, salt and spaghetti squash strands. Toss well, sprinkle in the parmesan cheese and taste to see if you need additional salt. The spaghetti squash should have a slight crunch (i.e. not mushy) - but if you like it softer, cover the pan and cook 2 more minutes.

Thursday, November 6, 2014

House Treat Box

Our challenge this week for Cutting Cafe was to use either the House Shaped Card set or the 3D House Set. I chose to use the 3D house with a bit of a twist. I had seen on Pinterest where they made a house without a roof for a treat box and knew I wanted to do the same. After I fill it with goodies, I can make a tag that says something like "from my (our) house to yours".
First I cut the house out of kraft cardstock. I used the open roof option and just cut off the tabs. I glued a book page to the roof and designer paper for the house sides to the kraft cardstock with Mono Aqua Liquid Glue. I wanted to use an adhesive that I could apply to the entire piece of paper so it wouldn't bubble up where there wasn't adhesive (in humid weather) and to make it a bit stronger when it dried. I would have preferred using a glue stick, but was out, so just used what I had. I then cut a cracker box up and adhered that to the inside of each piece to make it even stronger. I laid the pieces out and adhered the side tabs all together with the exception of the last side so that it laid flat and did my decorating  of the front and back of the house sides (the back only has the rick rack and glittery rope piece).


I hand-cut a little chimney and added that to the front of the house roof. The door was created using the rounded top door piece and moving one of the window pieces into it. I enlarged it and it's hard to tell, but I added a piece of vellum behind the window.
To finish it off I created a base using  chipboard aka cracker box covered with another book page, adding chunky glitter to the roof, door and windows, punching holes in the sides to create a handle. I had sooooo much fun creating this and now want to make a bunch of them. I want to make some houses with roofs as well.

Be sure to visit the Cutting Cafe Blog on the 7th to see the design team's projects in which you can leave a comment to be entered into a drawing to win 3 FREE sets of your choice from the online store.

Tuesday, November 4, 2014

BFB Where Treetops Glisten

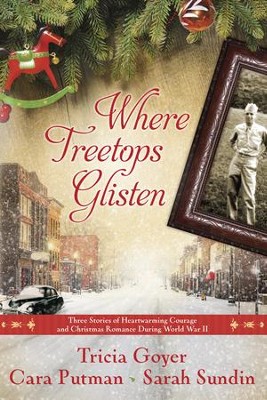
Where Treetops Glisten -eBook   -     By: Tricia Goyer, Cara Putman, Sarah Sundin


I rec'd the above e-book from Blogging for Books. The 3 stories in this book are about the 3 Turner siblings (Abigail, Pete, and Meredith) and the stories all take place during World War ll. Each one has faced heartbreak and each one searches for hope and peace.


The stories were good, but the reading wasn't as smooth and exciting as some I have read. I give it a 4 out of 5 rating.

Monday, November 3, 2014

Altered Dollar Store Christmas Gift Challenge

This week I am the hostess for Tombow's monthly challenge. My challenge is to alter a dollar store item into a lovely gift to give for Christmas.

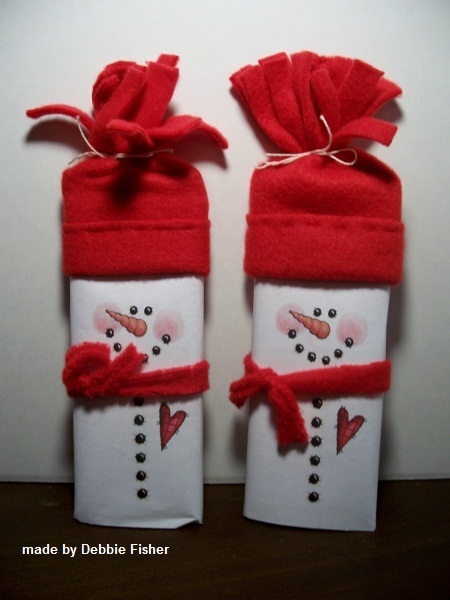
I made some candy bar covers using Xtreme adhesive to close the paper around the candy bars and to attach the hats.

Here are some altered candles using Xtreme adhesive & Mono Liquid Aqua to adhere all the pieces. The fun thing about this gift is after the candle has been burned down, you can clean it out and then use it to store covered candies, buttons, tea bags, etc.


cranberry cobbler candle topcranberry cobbler candle

If you would like to play along with us for a chance to win the prize below, please hop over to the Tombow blog for more information. I can't wait to see what you all come up with.

Pinnned It Made It Monday Week 44

Today's pin involves my youngest cutie patootie nephew. He wanted to be Mickey Mouse for Halloween and his mom asked if I could make him a costume. He had the clothes, so I just sewed big felt buttons on the shorts, drew black lines on Dollar Store white gloves and made the Mickey Mouse ears using this pattern from THIS pin on pinterest, courtesy of Wiki.


Can you stand the cuteness?! Ü

Friday, October 31, 2014

Frugal Friday 10-31-14

*earned $40 through Swagbucks: redeemed into Amazon bucks. Ordered some Christmas gifts and items to use for a refresh and revitalize banquet at our church
*made my own hamburger buns. My 8 yr old nephew says they are the best buns ever. 
*made banana bread with over ripe bananas in the freezer
*made homemade corn chips with corn tortillas 
*made Mickey Mouse costume for my nephew for under $5
*50% off fall napkins for a banquet I am decorating for
*also for banquet, I have been able to create the decorations for under $20 (for 150 people/19 round tables) using stuff I already have: 
items left over from B & K's wedding
craft supplies I already own
nature....grasses, tree limbs, etc.
**will have pics of it on my blog next week.

Grocery Deals:
*used coupons for free Chicken of the Sea Salmon at Walmart. Scored 3 of them
*Lays potato chips 1.79/bag regularly 2.50
*Lipton Tea Bags (100) 1.99 w/ coupon
*General Mills Cereal sale price 1.99 minus 75¢ off coupons I had (I rarely buy name brand cereal as it is too expensive)
*spaghetti squash normally 3.88/lb and I had a price match of 49¢/lb! very excited!
*50¢ off milk on Milk Monday. I scheduled my dr. appt on a Monday purposely to be able to get this deal

Greatest score of the week:
I didn't buy this mom did...June was our 25th wedding anniversary. Silver represents 25th anniversary and since I am always borrowing her silverware when we have company (I don't have a lot), she said she would buy me some silverware.

Well, yesterday was the first day that worked for us to get together and me to pick out some. She had been in Penney's before and saw they had some for $100 (set of 8) and said she would buy me a box, just to pick out what I wanted.

So we get there and they are having a 50% off sale! So she told me to pick 2 boxes, which would be perfect...set for 16 plus what I have and I wouldn't have to borrow from her when everyone is here for the holidays.

So there are signs on the different boxes and we pick boxes from the $100 sets (so we thought) and get to the counter and see there is a tiny price tag that says $180. I am bummed, but I tell the lady that the sign sitting on the box said $100. So we go back and look and the sign has a list of all the names of the silverware and the ones that mom and I picked out (mom decided to get 2 boxes for herself as well) weren't there. BUT the name wasn't on the sign for the $180 set sign as well. 

The sales lady is trying to figure out what to do and I'm looking around. Back behind some dishes is a sign...WITH the names of the sets that mom and I had picked out AND saying the sale price is 44.99 for mine and 39.99 for mom's! SCORE!!!! So there was a saving of over $550. All four boxes would have come to $720 and we got them for 169.96. I am pretty excited as we are having Thanksgiving here and we can use the new silverware!

So glad we were paying attention. I wonder how many had to pay $90 box (what they rang up as) when they are really over 1/2 of that!


Monday, October 27, 2014

Pinned It Made It Monday Week 43

Made THESE chocolate chip cookies with my youngest nephew this past weekend. He requested "made chocolate chip cookies with sprinkles; eat chocolate chip cookies with sprinkles; and play legos" for when he knew he was coming to stay. LOL


I've been making this recipe for quite some time now, but don't think I've ever posted a picture. And how can they get any better with this cutie showing off what we made.

Chewy Chocolate Chip Cookies
Cooks Illustrated from Ourbestbites.com
2 C plus 2 T flour
1/2 t baking soda
1/2 t salt
12 T butter (1 1/2 sticks) melted and cooled until warm
1 cup brown sugar (light or dark)
1/2 C granulated sugar
1 large egg + 1 egg yolk
2 t vanilla extract
1 1/2 C semi-sweet or bittersweet chocolate chips
    
Heat oven to 325 degrees. Adjust oven racks to upper- and lower-middle positions. Mix flour, salt, and baking soda together in medium bowl; set aside.

Either by hand or with electric mixer, mix butter and sugars until thoroughly blended. Mix in egg, yolk, and vanilla. Add dry ingredients;mix until just combined. Stir in chips.

*If for some reason your dough is too soft to form balls at this point, don’t add more flour.  Just cover and place bowl in the fridge until dough firms.

Take about 1/4 C dough and form into a ball.  Break ball in half and place dough on cookie sheet with broken edge facing up.  (Or just use a standard sized cookie scoop). Bake until cookies are set around outer edges start to harden yet centers are still soft and puffy, 10-13 minutes.  Cool cookies on cookie sheets. Serve or store in airtight container.

Friday, October 24, 2014

Blog Hop with Lindsay Weirich

October 24th: Blog hop with Guest Designer Lindsay Weirich also known as the frugal crafter. Today we are all creating projects using Tombow's  New MUTED Dual Brush Pen Set.
This is a card I created with Inky Antic's stamped image in black using the paper to acetate technique I talked about HERE.


The moon is colored in to accent it. I used Mono Adhesive Permanent and the wine red, yellow gold and burnt sienna Dual Brush Pens from the New Muted set.

There is a fun prize that you can enter by hopping along with us and leaving comments along the way.
 

The Prize includes:
Dual Brush Pen Set, 10 Muted
In order to be qualified to win this amazing PRIZE, PLEASE comment on each of the designers projects. Tombow will announce a winner Monday 10/27.
Tombow's “No Tricks just Treats” sale also starts today.

The sale is…
Purchase any 10 piece set and receive a FREE Blending Kit!
Offer is available 10/24-10/31
Now it's time to head over to Melissa's blog, to see her amazing project!
The Lineup for this hop is:
TombowUSA
Debbie Fisher
Melissa Cash
Jennie Garcia
Marie Browning
Lindsay Weirich
TombowUSA Blog

Monday, October 20, 2014

Pinned It Made It Monday Week 42: Wedding Shower & Kassy's Birthday

I had a very busy, full, and wonderful weekend! Aaron came home for fall break, Saturday, I co-hosted a couple's wedding shower for a gal who grew up in our church, and Sunday, Benjamin and Kassy came out to celebrate Kassy's bd and spent the day. So much fun!

For the shower, Ashlea's colors were plum and ivory with a vintage theme. I headed to Pinterest right away to get some ideas for a shower for them.

I made these hydrangea balls using Cutting Cafe's Pocket Shaped Card Cutting File. My inspiration was THIS pin on pinterest.


Here are the blackberry cupcakes I made using THIS Jello Poke Cake recipe. I used blackberry Jello and then added a few drops of blue food coloring to it, to make it purple. The "frosting" is just Cool Whip with melted Blackberry Jam drizzled on top.

Kassy really liked THESE Salted Caramel Cupcakes I made last year for Thanksgiving and had commented that they need to be made more than just at Thanksgiving. So I turned the recipe into a beautiful birthday cake for her.


Instead of cupcakes, I made a 2 layer cake and then piped roses on the top with the frosting, drizzled the homemade caramel and sprinkled with sea salt.


My beautiful DIL with her cake:


Friday, October 17, 2014

Frankenstein Belly Box

My Scrap Chick has the cutest belly boxes and I just had to make this adorable Frankenstein one. In fact I made 5 of them and have them at the Hobby Shack if you would like to purchase one for yourself or as a gift.

I used Tombow's Xtreme Adhesive to put it together. I think this turned out so cute and it's ready to fill with candy.


#mschalloween  You can go to Facebook HERE or to their blog HERE to like my project. I entered it into their Halloween Contest.


Frugal Friday 10-17-14

Frugal Garden:
*picked the rest of the tomatoes from the garden. They are STILL green, but hoping that they will turn red eventually
*harvested the rest of the peppers...must have been a great year for them as we had a bumper  crop of peppers...not much anything else, but definitely peppers
*the beans were in a sad state, but we just let them dry out and harvested the bean "seeds" from inside. I will use them like dried beans and add to soups
*picked ONE little zucchini. The ONLY zucchini from 2 plants that we got all year. I think this is a record for zucchini as I didn't know one could get so FEW. LOL
*ended up with 3 pumpkins. kinda sad, but it's more than none
*FIL brought over potatoes from their garden. Bruce helped him dig them up. We will share with the kids
*SIL shared some of their sweet potatoes with us for helping them dig them up. Oh my!!! We definitely will be planting some of these next year. What a treat!
*great deal on shredded cheese for $1.50/bag


Frugal Grocery Deals:
*bought a quart of buttermilk for 99¢ with in-store mark down. I like to use this for biscuits, pancakes, scones, muffins, etc. Now that the weather is cooler, I'm baking more
*97¢ for 5 lb flour and 4 lb sugar...stocked up for fall and winter baking
*cream of chicken soup 49¢ each-the only thing I use this for is hashbrown potato casserole
*Hershey's chocolate chips $1.48 each! Bought four of these for holiday baking or just because. Ü
*Mission brand flour tortillas $1/pkg. I know I can make them homemade, but at this price, it is a huge time saver and so worth it.


Frugal Baking:
*made pumpkin bread in little loaf pans and froze one for son to take back to college after fall break (or he may just eat it this weekend and I'll make more. Ü)
*made cinnamon rolls to thank my brother for helping out on Wed night youth group (DH and I have 12 3rd grade boys on a regular basis...14 if they all show up), made a double batch and shared with son and DIL


Misc Frugality:
*helping host a wedding shower tomorrow using a lot of things I already had. Her colors were plum and ivory, so was able to use some of the flowers from B & K's wedding and her mom shared some decorations left over from the wedding for us to use. Purchased candles from the Dollar Store, some fabric from Walmart and then pretty much used things I had around the house. I will have pictures posted Monday.


*decided to try my hand at homemade laundry soap. I didn't think I could as several articles I read said it doesn't work with hard water, but SIL found some info for THIS recipe that is suppose to work with hard water. So far, I can't tell any problems


*redeemed $35 in swagbucks, used part of it (plus what I already had saved) to buy birthday and Christmas gifts (I have actually earned more than this in the last 2 weeks, but haven't redeemed those points yet)


*earned $10 via Memolink. I am working on another $10 then will be done with them. I have been SLOWLY earning points through them for over 2 years! Swagbucks is MUCH faster. I was trying for $25, but they dropped it so you could cash in for $10, so did that and had several points left over, so will keep going to get the other $10 then done.


*rec'd a LARGE roll of paper towels with a message saying I had signed up to receive this, use for a couple of weeks and write a review for them. I don't remember doing this at all as I write down everything I sign up for, but that is okay. It is by Bounty and I only buy cheap brand paper towels, so was a nice surprise to receive.


*posted this on FB, but will post here. Used a coupon for a $1.79 runza at Runza (normally 4.39 which I wouldn't have paid for to begin with), but it comes with a funny story:


me: "I have a coupon for $1.79 regular runza, can I use this for a swiss mushroom runza"
guy working: "um, just a minute...comes back, yes, but you will have to get extra ingredients on it...is that okay?"
me: (so GLAD I was in the drive thru as I'm afraid I wouldn't have been able to keep a straight face) "yes, that will be fine"


they just charged me 50¢ extra. since that ended up being my dinner and supper, it was a fairly good deal

Thursday, October 16, 2014

Flexi Clip Winner

Michelle Pearson, you are the winner for my Flexi Clip Give-a-Way! Lizzie will be contacting you soon. Congratulations!

There is a sale going on right now...   www.lillarose.biz/zizzie78  ... its for 72 hours. These would make great gifts and it's something you can't find anywhere else.

Pumpkin Shaker

Fall is in the air this week on Cutting Café. We were given a choice of two different sets to work with: HALLOWEEN AND FALL IN A JAR or the HALLOWEEN AND FALL SHAKER SET.


I chose the pumpkin file in the HALLOWEEN AND FALL SHAKER SET. this was so fun to create with. I realize I need more items to use in a shaker and that FINE glitter does NOT work. LOL! Thankfully, I had some chunky gold glitter and white sequins that went okay with the pumpkin theme.

Tombow's Foam Tabs come with a sheet of 414 pieces - 1/5 in and 50 pieces - 1/2 in. I use the 1/2" size a lot and had all these sheets with 1/5" that I rarely use and they ended up being the perfect size for making this shaker. Took awhile to line them all up around the edge and only used less than 2 rows. Ü

Be sure to stop by the Cutting Cafe blog Tuesday the 21st and leave a comment for a chance to win 3 files of your choice.

Tuesday, October 14, 2014

Skull Treat Box

This week the Tombow DT is creating with pink in their projects in honor of it being Breast Cancer Awareness Month. Since it’s getting close to Halloween, I created this fun Skull Treat Box using the file from Cutting Café.


I used Xtreme Adhesive to put the box together as you want a very strong adhesive so it doesn’t come apart. I also used Power Tabs for the buttons and bow. I actually made 5 of these as well as some other ones that I have at the Hobby Shack in Broken Bow if any one is interested in them.

Monday, October 13, 2014

Pinned It Made It Monday Week 41

**UGH! this didn't prepost again! Awww BlogSpot, how I love to hate you at times! Thank you to those that e-mailed me. Now I know some of you are paying better attention than I am to my blog. LOL

This weekend I used the first pkg of peaches that I froze this summer using a recipe from THIS pin. It was so-so. Not bad, made the house smell amazing, but not great enough tasting for me to make again.


For me it had way too much of the crumb topping. I think it would have been better to have made in a 9 x 9 pan with about 1/3 of the topping, so that the peaches shined through more.

Saturday, October 11, 2014

Flexi-Clip Review and Give a Way

A few weeks ago I won a Flexi Clip via A Joyful Chaos' blog. I was really curious about this product as I have very thick hair and I've never found anything that will keep my hair up and if I do find something it is so tight I end up with a major headache. It is even hard to find pony tail holders to fit.

I was so excited when I rec'd this Flexi Clip. I put my hair up and wore it all day and my hair did not fall or come undone the whole day, nor was it too tight. I ordered the large as I roll my hair up and then fold it down. This type of clip will work on any hair. You just order the size you need for your type of hair. Now I need to get a smaller one for when I just want to pull part of my hair back. The large was too big for that as I tried. (I didn't realize it was in a bit crooked, but it still works.)


Lizzie is letting me give one of these away for one lucky winner to try!

To enter the giveaway you can go to her site, www.lillarose.biz/zizzie78 and watch the sizing video and pick out what size and what flexi you like and then come and leave a comment on my blog.  For more entries...

1. Go to her site and log in as a customer (you aren't required to buy anything) (attached is an image  to show how easy it is) 


2. If you have a Facebook account go to her Facebook page and "like" it https://www.facebook.com/LillaRoseZizzie78

3. If you have a blog or facebook and share this then you can get additional entries into the giveaway.

The winner will receive one free flexi clip in stock (their choice of size) ....however not the flexi of the month. I will draw a name on Thursday morning for a winner for this prize.

Tuesday, October 7, 2014

Getting Krafty with Inky Antics

I had the pleasure of creating some fun projects for Inky Antics. The image is from 10904L Costumed Quartet (drawn by artist Ronnie Walter), which actually includes four different trick-or-treaters from which to choose. I just used 3 as they were all boy images. (The 4th is a cute little girl witch.)

For my first projects I also used Inky Antics' X1-0020 Gift Bag Template stamp.


Then I created a tag. The little image is perfect for tags and still allows you to do some decorating of the tag to coordinate with the image.

 And for my last project a card.


The "designer paper" is digital images from Daydream Designs by Diane. It is in their Birthday Bash DK Kit. I had already colored the images and then had rec'd an e-mail from them saying they had a free digi image for World Card Making Day. I downloaded it into my Daydream file and looked at what I had in there and saw that digi paper and couldn't believe how perfectly it worked with my colored images. So I just printed it onto kraft cardstock and love how it turned out.
 
I definitely need to be stamping on kraft cardstock more!

Monday, October 6, 2014

Pinned It Made It Monday Week 40

My Pinned It Made it is in conjunction with our challenge for Cutting Café. I loved this pumpkin treat box that Regina created and knew I wanted to sew on mine as well.

The Cutting Cafe Blog will  be revealing all the Design Team's Pumpkin projects tomorrow. Of the files we were given to choose from, I chose the Pumpkin Treat Box. I ended up making 5 of these fun boxes. I can just see them filled with those overly sweet pumpkin candies that I do NOT like, LOL, but they would sure be cute in these boxes. Oh wait...even BETTER...Resees snack size would be perfect!


Tombow's Xtreme Adhesive was used for these boxes. It is super strong and perfect for projects like this.

Be sure to stop by the Cutting Cafe blog tomorrow and leave a comment for a chance to win 3 files of your choice.

And stay tuned here as well as this past weekend I was a busy beaver! I made 21 boxes, 2 cards and a tag. You will get to see a card, tag, and box tomorrow. Ü

Shadow Box Challenge

The monthly Tombow challenge is this week and Marie is the hostess. She is challenging everyone to make a shadow box. If you would like to play along, please got to the Tombow blog to read all about it.


Here is one I created for the Cutting Café awhile back. You can click on the image to make it larger. I used a lot of Xtreme Adhesive to make sure that everything stayed together.


Saturday, October 4, 2014

WCMD Card #2

This card is created using free digi images from Daydream Designs by Diane. She is offering the hedgehog image and sentiment for free until Monday. I also used a couple of background papers that I had received a long time back from her blog as well called Dancing Tulips and Pink Grid.


Using pre-colored images make card making even quicker. This card took less than 5 minutes to make, but I think it still turned out very cute. Come and play along...