Tuesday, December 30, 2014

Kisses and Wishes

This last week of December the DT was challenged to create a project for you that was New Year's Eve Party themed. Our family doesn't really do anything on New Year's Eve unless it ends up being the time that we can all get together for Christmas, which actually happens to be New Year's Day this year.

So I went to Pinterest to try to find some ideas. I wanted to make a non-alcohol project and after doing quite a bit of research, I put some ideas together to come up with a "Kisses and Wishes" gift one could give to those attending a New Year's Eve Party, or to just give to a friend. The idea is to "kiss" the old year goodbye and to light a candle and make a "wish" for the new year.


I designed the tags that says "Kisses" and "Make a Wish" for the individual items then went "shopping" in my supplies.


When I think of celebrating the new year, silver and gold come to mind, so I looked through my stash and came up with mostly gold. I found designer papers and embellishments from My Mind's Eye, gold glitter from the Art Institute, some gold twine I had picked up at an antique store and forget to use, a mini gold ornament, and a Christmas garland. I gathered all my goodies and got to work.


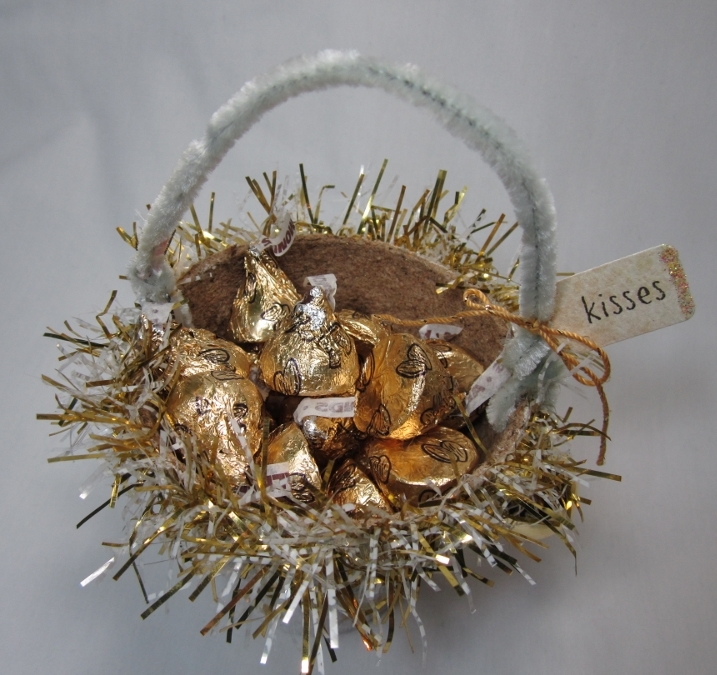
The "kisses" project was made by painting a peat pot white and then adding glitter dots using Mono Multi Liquid Glue and gold glitter. The nice thing about Mono Multi is that when it "dries" it stays tacky, so I just rubbed the glitter onto the glue and it worked perfectly. Adding more adhesive to the top of the peat pot held the garland. Add a chenille handle, mini Christmas ball, and tag and then fill with Hershey Almond Kisses (I chose the almond ones since they are covered in gold foil.


The "wishes" project is a candle in pear scent and had a gold color, so perfect for my color scheme. I added washi tape around the candle lid and then decorated with designer paper, brads, twine and a tag. The flower on top of the lid is from May Arts. I used Xtreme Adhesive to adhere the papers to the jar and Foam Tabs for the embellishment on the front of the jar. The stick pin is from Dreamweaver Stencils.


Thank you for stopping by. I hope you enjoyed this project. This is my last post as a Tombow Designer.

Monday, December 29, 2014

Pinned It Made It Monday Week 52

This is my last week for PIMIM for 2014. Did you enjoy these posts? Should I do it again in 2015? What are your thoughts?

I made cinnamon rolls from this pin and peanut butter frosting from this one for Aaron's birthday yesterday. I can't believe my youngest born is 20!! Fortunately my mixer was able to do most of the work, since I've been sick with pleurisy and very little strength and energy.


My notes: I really liked how this dough rolled out. It did not shrink back like my other recipes, but...DO NOT leave out sugar when adding cinnamon. The site claims that cinnamon rolls dry out because the sugar pulls out the moisture. But they need the sugar!

Cinnamon Rolls

Combine the following in a large bowl:
3 1/2 cups King Arthur Unbleached All-Purpose Flour
2 teaspoons instant yeast
2 tablespoons potato flour or 1/4 cup instant potato flakes
2 tablespoons Baker’s Special Dry Milk or nonfat dry milk
3 tablespoons granulated sugar
1 1/2 teaspoons salt
4 tablespoons soft or room-temperature butter
2/3 cup lukewarm water
1/2 cup lukewarm milk

Mix to make a rough dough…then knead for about 7 minutes, to make a smooth dough.

It’s OK if the dough sticks to the bowl a bit; better a dough that’s too soft than too dry.
Of course, you don’t have to use an electric mixer. You can get the dough to this point by using a bread machine or your hands, too.

Notice this is a fairly smooth dough, but it does have a bit of surface roughness; that’s OK.

Place the dough in a lightly greased container — an 8-cup measure works well here — and allow the dough to rise for 60 to 90 minutes, until it’s just about doubled in bulk.

Gently deflate the dough, and transfer it to a lightly greased work surface. Shape it into a rough rectangle.

Roll the dough into a 16” long rectangle, about 12” wide. This soft dough rolls easily, so you shouldn’t have much trouble with shrinking or “push back.”

Sprinkle 2 teaspoons cinnamon over the surface of the dough. A small sieve or tea strainer works well here. (My Note: ADD SUGAR!!)

How come plain cinnamon, not cinnamon-sugar? Because sugar is hygroscopic, and will draw moisture from the dough. The result?  Cinnamon buns that aren’t as moist as they might be. Don’t worry, the final sugar glaze on top will give you plenty of sweetness. (NO it does not! LOL)

Ready to roll!

Starting with a long side, roll the dough into a 24” log. How come we end up with a 24” log? Because as you roll, the dough stretches. If it’s not quite 24”, no sweat; it’ll be fine.

In order to make the neatest job of cutting the buns, use a sharp knife to mark the log at 1” intervals.

Here’s a trick beloved by King Arthur bakers all over the company: using dental floss to cut the neatest possible cinnamon or sticky buns. Loop the dental floss under the log where you’ve notched it. Pull the ends in opposite directions. Bob’s your uncle – beautifully cut buns, with no squashed dough or oozing filling.

Lightly grease two 9” round cake pans. Divide the buns between the two pans, spacing 8 in each pan. Gently flatten the buns a bit.

Two pans of buns, ready to rise.
Can you freeze one pan of buns at this point?
Well, not quite… Let it rise till they’re quite puffy, then cover tightly, and freeze. For directions on how to bake at a later date, take a look at our FREEZE! blog.

Cover the pans, and allow the buns to rise till they’re crowded against one another and quite puffy, about 60 to 90 minutes. Towards the end of the rising time, preheat the oven to 350°F.

Can you freeze one pan of buns at this point?
Yes. Simply over-wrap with several layers of plastic, and freeze. For directions on how to bake at a later date, check out our FREEZE! blog.
Uncover the buns, and bake them for 20 to 23 minutes.

They’ll be golden brown on top, and the edges of the center bun will spring back lightly when you touch it.
To serve buns immediately: Just before the buns are done, stir together the  following:
1 cup confectioners’ sugar
1/4 teaspoon cinnamon
3 1/2 to 4 tablespoons cream or 2 to 3 tablespoons milk

Turn the hot buns out of the pan onto a rack, and brush each pan with 1 tablespoon melted butter.  this will help keep the buns soft and tender.

Spread with the glaze, and serve immediately.
To serve the buns later: Turn the hot buns out of the pan onto a rack, and brush with the melted butter. Cool completely. Wrap airtight and store at room temperature for a couple of days; for longer storage, freeze.
Just before serving, tent the buns lightly with foil, and rewarm in a preheated 350°F oven for 10 minutes (a bit longer, for frozen buns).

Stir together the glaze, brush over the buns, and serve warm.
Want to serve only half the buns now? Make just half the glaze. If you reheat a glazed bun, the glaze melts and disappears. Reheat a plain bun, then glaze.


Peanut Butter Frosting

Ingredients

4 cups powdered sugar                                      
1/4 cup peanut butter
6 tablespoons milk

Directions

  1. In a medium bowl, combine powdered sugar and peanut butter. Stir in enough milk to reach spreading consistency.

Friday, December 26, 2014

Frugal Friday 12/26/2014

*orange tablecloths marked down to 50¢ each (we use these for ladies night out, not as good as last deal, but still better than full price)
*more cream cheese for 79¢...needed these for dip for Ladies Night Out
*milk $2.99/gallon
*tea bags $1.99 with price match plus coupon
*king size hershey bars 59¢ each...will use these for fun Christmas goodies
*large bag of M & M's $1.50 with price match and coupon
*regular bags of M & M's 30¢ each with in store sale plus coupon
*used Swagbucks to order Christmas gifts from Walmart and Amazon
*earned $10 from Inbox Dollars...takes MUCH longer than swagbucks, but free is free
*was able to get 2 pallets for free....would like to find more for some wood projects
*downloaded free svg cutting files
*I won a super fun pkg of goodies via Lori's blog! I've had fun creating some Christmas goodies with what I rec'd.

Monday, December 22, 2014

Pinned It Made It Monday Week 51

I made Twin Bing (or also known as Cherry Mash) candy from THIS pin, but didn't get a picture before they were all gone! LOL I have a microwave recipe that I've tried for years and maybe one of of 7 times the bottom would set, otherwise it was a  messy goo you had to eat with a spoon (not that any of the guys complained about that!), but it was nice to finally make a batch and they set up perfectly. I think that by cooking it on the stove top and being able to control the temperature is the trick.
Cherry Mash/Bing Bar. I make these every year at Christmas, but I think I might be the only one that actually likes them....
photo courtesy of food.com

Cherry Mash Bars

Ingredients
    • 1 cup sugar
    • 2 tablespoons butter (I used butter) or 2 tablespoons margarine ( I used butter)
    • 1/4 teaspoon salt
    • 1/3 cup half-and-half (I used 1/2 and 1/2 mixed with whole milk) or 1/3 cup undiluted evaporated milk ( I used 1/2 and 1/2 mixed with whole milk)
    • 1 cup miniature marshmallow
    • 1 cup cherry chips
    • 1 cup chocolate chips (I used Ghirardelli Bittersweet Chocolate about 3 1/2 ounces) or 4 ounces bittersweet chocolate ( I used Ghirardelli Bittersweet Chocolate about 3 1/2 ounces)
    • 1/2 cup peanut butter
    • 1 cup salted peanuts

Directions

  1. Combine sugar, butter or margarine, salt and half and half in saucepan. Boil on high heat for about 5 minutes, stirring occasionally. Stir in marshmallows and cherry chips.
  2. Spread in 8 or 9" square pan which has been lined with parchment or wax paper.
  3. Melt chocolate with peanut butter in a small pan over low heat, stirring occasionally.
  4. Stir in peanuts. Spread evenly over cherry layer.
  5. Let set in refrigerator. Cut into 1" squares with warm sharp knife (hold under hot water and then dry before cutting).

Sunday, December 21, 2014

BFB When Mercy Rains

I signed up to receive this e-book from BFB, but never rec'd it. I tried contacting Blogging for Books 3 different ways and they never responded.

Saturday, December 20, 2014

CC Gift Bows

Are you ready for Christmas? It's sneaking up on us fast. I'm not sure when we will be celebrating as the kids have a lot going on this year and need to be in other places, but the exact day doesn't matter to me. Jesus wasn't born on the 25th of December, so I don't get hung up on we HAVE to have Christmas that day. What is important to me is just spending time with family and we will take that whenever it works out for them to all be here. I believe the spirit of Christmas should be in our hearts all year long, not just one day of the year that someone determined it to be. I look forward to a fun time filled with food, games, laughter and just hanging out with them.

We had a snow day Monday, so I took advantage of not going in to work (so thankful since my job requires driving and the roads were so icy!) and did some gift wrapping, baking, and finishing up some gifts.

This week the Cutting Cafe Design Team is showcasing just one file: Gift Bow Template and Cutting File. It is the perfect file to add a little something special to your packages. It seems no matter how careful I pkg bows, they tend to get smashed from year to year. By making your own, you can coordinate the bows to the pkg AND make them fresh and new each year, so no smashed bows!
 Be sure to visit the Cutting Cafe Blog on the 7th and 21st of every month to see the design team's projects in which you can leave a comment to be entered into a drawing to win 3 FREE sets of your choice from the online store.

Here is how much we had Monday morning and it snowed all day, so probably another inch was added. Still quite a bit of snow on the ground with more in the forecast.

Tuesday, December 16, 2014

Double Pocket Drink Holder

Last week I received a lovely prize package from Lori Hairston's Vision of Sugarplums Blog Hop. Oh my!! It was so full of so many fun things. It was like Christmas came early for me. As soon as I saw the red and green striped waxed bags, I knew what I wanted to create.

I made this fun little double pocket bag that can hold a hot chocolate packet and a tea bag as well as a candy cane.
IMG_0339 (675x900)

I folded the  bottom 2/3-ish of the bag up and adhered the sides with Xtreme Adhesive. This creates a pocket as well as the pocket at the top from the natural opening of the bag.
IMG_0341 (675x900)

To add some contrast, I cut some checked designer paper to the bottom pocket I created with Xtreme Adhesive and then added a paper doily with Mono Adhesive Dots. Some coordinating washi tape, a fun bauble, and some gold twine ribbon finish it off. The washi tape and twine were also part of the prize package.

To make the Santa bauble, I punched a 1" image from some designer paper and adhered to the 1" flat back marble with Mono Liquid Aqua Glue and then adhered to the front of the double pocket bag with Xtreme Adhesive.
IMG_0340 (675x900)

There is enough candy cane to stir into some hot chocolate, hot vanilla tea and to enjoy by itself. This is a perfect little gift to give  and easy to whip up.

Monday, December 15, 2014

Pinned It Made It Monday Week 50

Anyone notice that I have been way off on my weeks? I went to post this and it would have appeared to be week 47. I knew that wasn't right since we are almost to the end of the year and I went back and really goofed up with some weeks being repeated. Got it all straightened out now. Ăś

Last week a friend and I hosted a "Frozen" party for several ladies in Comstock. It was so much fun! I created these invitations with the inspiration coming from THIS pin. In the invitation we challenged the ladies to make a treat to share that was "Frozen" related in food or color. For example they could have brought carrots to represent Olaf's nose and dip: snow. The color theme was white, silver, purple and blue to match the dresses in this free printable that I also found on Pinterest. You find my Frozen Pinterest Board HERE if you would like to host a party and need ideas.


To make the card I started with a very light aqua (you can see it right behind the scallop circle), then sponged 2 shades of darker aqua and blue ink around the edges, then again with 2 shades of purple. I stamped snowflakes from Stampendous in the darkest of the blue and purple as well as a few in white. (if you click on the photo you can see the white snowflakes a little better. I wish I would have embossed them now so they would have showed up better).

I googled free Frozen images and free scalloped circles and came up with this and this to add to the front of the card. I cut the images with a punch and the scallop circle with my Silhouette. Added a punched snowflake and sequin and ribbon to finish it off.

My friend Charlotte had a ton of decorations that was perfect for our party...

The food table before the food came:


Laden with lots of yummy food!...

First these plates were perfect for our theme. I bought them from Hobby Lobby 1/2 off.

and napkins left over from B & K's wedding.

How perfect are these cookies??!! Laura found them at Walmart.

my contribution was these jello pinwheels (recipe can be found HERE) made with  Cotton Candy jello (found at Walmart...an off brand, but yummy)


Charlotte made this yummy puff popcorn. Two ingredients!! Puff popcorn and almond bark. I am definitely making this for Christmas. She added some blue coloring to part of the batch. So fun and yummy!

and here she did the same thing with regular popped corn.

Blue dyed eggs with black olives (I'll let you use your imagination for the black olives. LOL)

White cheese and crackers
 I didn't get a picture, but there were also almond bark covered snowflake pretzels with blue and purple sprinkles

blue poke cake


Sandwiches from a song in the movie that says "we finish each other's 'sandwiches'"

 sandwiches made with a snowflake cookie cutter

The yummiest sugar cookies and cookies in the center!! I'm still waiting for the sugar cookie recipe, the ones in the center is a bag of white chocolate chips melted and then add 1/2 cup each of chopped nuts, coconut and dried fruit. She used walnuts and dried blueberries. Definitely making these for Christmas too!

White chocolate peanut butter balls

 And here it is... the table filled with food!

The tables decorated in the center that the ladies sat around...


We do a gift exchange each year and here is when part of the gifts came. I forgot to take a picture after everyone had brought their gift. 


 A great time was had by all and we had a lot of fun going with a theme this year. Usually it's just bring a gift and treat to share with a red table cloth for decorations. It's also usually in the morning and lasts an hour to 1.5 hours. By having it in the afternoon, the ladies were able to just relax and visit as long as they want. It started at 2 pm and I got home after 5:30. I loved having it later and believe the ladies did as well.

 "Do you want to build a snowman?" Ăś

Sunday, December 14, 2014

BFB God Gave Us Angels

God Gave Us Angels

By: Lisa Tawn Bergren This time from Blogging for Books I received a children's e-book "God Gave Us Angels" by Lisa Tawn Bergren. I read it to my 4 year old nephew and he loved it. This is a darling story of a papa bear and his cub having a conversation about angels. The artwork is sweet and this would be a great book to have in a child's library.

**I received this e-book from Blogging for Books for this review.

Friday, December 12, 2014

Frugal Friday 12-12-14

Kinda quiet the past 2 weeks for savings as I didn't do much shopping, which means even more savings really Ăś

*orange tablecloths marked down to 25¢ each (we use these for ladies night out)
*lace table cloths marked down from $8 to $1.50
*sweet potatoes 49¢/lb
*cream cheese 79¢/8 oz pkg
* free books from bookbub
* free book from Blogging for Books
*free movies
*90 % off fall items at Hobby Lobby. Scored some pumpkins to do THIS with next year
*gallon milk $2.99
*fabric sale plus coupon for gifts
*coupon on yarn for gift


Thursday, December 11, 2014

Star Joy Banner

Today is my turn to post for the Fancy Pants/Tombow Blog Hop. I have been a huge fan of Fancy Pants Designs for a very long time.

I was inspired by THIS pin on Pinterest to make this star Joy banner. The stars were cut with Cutting Cafe's new 3D Star Set. The rosettes are made from Tim Holtz dies using designer paper from Fancy Pants Designs' "Oh Deer" designer paper pack. This pack is filled with lots of fun goodies!


Thank you Fancy Pants Designs for all the fun goodies. Now be sure to visit the Tombow and Fancy Pants Designs blogs for more inspiration and leave a comment for a chance to win the prizes shown below.

Monday, December 8, 2014

Pinned It Made It Monday Week 49

Over the weekend I created 40 notecards for a friend that she will be sending to Belgium for Christmas! She had a foreign exchange student last year and the notecards will be going to his dad's girlfriend and his mom.The inspiration for for these notecards came from HERE and HERE on Pinterest.


The most consuming part was printing the Monograms one at a time. They come from Cutting Cafe's Monogram Set. I'm not very good at PDF's copy and pasting so I could print out a whole sheet at a time. It seems whenever I do, they are blurred, and I don't have a PDF converter program. If anyone has any tips on how to print out a whole sheet of Monograms, I would love to hear it as I need to make more cards. Ăś

Saturday, December 6, 2014

Snowman Shaker Card

It's looking a lot like Christmas on the Cutting Cafe DT's blogs! Our challenge was to use a Christmas Shaker Card using the images or words files. I chose to use the Snowflake shaker in the Christmas Shape Shaker Card Set.


I added red sequins and Shaved Ice glitter stuff to the shaker part of the card. I also cut the arms 3 times and adhered them together to make them stronger. The mitten was cut 2 times each.

Be sure to visit the Cutting Cafe Blog on the 7th and 21st of every month to see the design team's projects in which you can leave a comment to be entered into a drawing to win 3 FREE sets of your choice from the online store.

Thursday, December 4, 2014

Elf French Fry Box

Today is Day 2 of the Tombow Blog Hop with Core’dinations. Today I created for you a cute little elf box with the Fun with Fry Boxes  cutting file from Cutting CafĂ©. I don't know about you, but the whole "elf on the shelf" just freaks me out. I think the elf is creepy and scary, but the movie Elf was cute and I don't mind CUTE elf projects.


On to my box...I used Core'dinations cardstock in green, black and gold. The white is watercolor paper. I cut a back piece for the box out of designer paper by Fancy Pants Designs' Little Sport line, since is was just kraft brown (the back of the Core'dinations paper. IMG_0217 (900x675)

I used Mono Adhesive Dots for the collar & designer paper and Xtreme Adhesive  for the rest. I filled it with these cute striped fuzzy socks that I got on sale Sunday at our local farm equipment store...3 pair for $2! These will make some fun little gifts.
IMG_0215 (675x900)
Be sure to stop by tomorrow to see what Marie created for this hop.
Thanks for stopping by!