Tuesday, June 30, 2015

Lilla Rose Review and Give-a-way

Today I am sharing my thoughts on a Lilla Rose hair clip I received in exchange for my review. My friend Michelle is now a consultant for Lilla Rose and you can find her website here.

I have a large clip that I love and use to put all my hair up. For those of you who know me, you know I have very thick and curly hair. I could never find a clip that would work on all my hair until I tried my first Lilla Rose clip. The cool thing about these clips is that they are flexible and can hold a lot of hair or very thin and fine hair if you use a smaller clip.

For this review, I chose a small clip as I was wanting something I could use to just pull up the sides of my hair to the top of my head and possibly to use as a pony tail holder. I was so excited to find out that the clip I chose allows me to do both! I chose Lilla Rose's 1-0648 Flora Metals.
The clip is very tight if I use it as a pony tail holder with my hair dry, but still holds. It works better if I put it in while my hair is still damp. I love that it holds all day and doesn't give me a headache by being to tight or my hair constantly coming out like when I use other products.

Here are a couple of pictures of me using it with my hair up on the sides and in a pony tail. You can really see how the clip is flexing on the pony tail.


Now on to the fun part! The giveaway...
*Michelle is offering this giveaway as an Independent Lilla Rose Consultant: 1 flexi-clip of $16 value or less that is in stock (flexi of the month excluded) 

*This giveaway is open to readers who are not currently registered as Lilla rose Customers

* the winner will need to register on Michelle's site as a new customer and she will send them a free flexi (Offer valid in US only)

* all you have to do to enter is go to Michelle's site www.lillarose.biz/mpearson and watch the sizing video to find your size. Then pick out your favorite clip and leave a comment here on this post telling me what it is. I will leave this open until July 3rd and draw a name on July 4th.

*for those of you who don't win and are not currently a Lilla Rose customer, Michelle will offer a Buy 3 get 1 free coupon!! all you need to do is register as a customer at www.lillarose.biz/mpearson and purchase any 3 items. **Offer valid in US only. Offer is for one free item $16 or less available on the Lilla Rose website. Offer good for new online customers only and one per household. No cash value or exchanges. Must be 16 years of age. Registering on the Lilla rose website with a valid personal email address is required to take advantage of this offer.

Thursday, June 18, 2015

owl woodland baby shower

Shower #11 and counting for the year! Ü This was a woodland theme focusing on owls. Baby Wood's (how cool is that? the last name is Wood and it's a woodland theme) nursery is decorated in pink, green and gray. I went more pink, green and browns for the shower.

It all started off with an owl invite to the afternoon shower using a Silhouette file (all the links will be at the bottom of this post):


I found some adorable owl plates, but they were over $10.95 for 8, plus a ridiculous shipping charge, so that wasn't happening. These plates don't have owls on them, but they ARE baby and they ARE the perfect colors. Snagged these at the Dollar Tree, so definitely a much better deal.


For the table centerpieces, I made more of the owls that I made for the invites and inserted a wooden skewer between 2 owls that I glued together. There is a foam piece in the jar that the skewer inserts into and then added the green flowers. The small pinecones were picked locally.


We had two kinds of cupcakes: vanilla and chocolate. I used LARGE pinecones all the way from CA  for the tags telling what the food was. The pinecones were from my cousin for her nieces wedding that she picked in her yard. Thank you Brandy for letting me borrow them!

 Trail mix:

pink coated chocolate candies (like sixlets) that someone donated asking if I was going to have a shower that had pink...they worked perfectly for this shower

These were so much fun! So thankful to Jean who was willing to make these for me! She made 3 different kinds with meats and cheeses in them.


This punch was not only the perfect color, but so refreshing! Only 2 ingredients: raspberry sherbet and 7-UP!

Centerpiece on the sign in table


Here is the momma to be. Can't wait to meet baby girl Wood! 

Links:
Owl invite file
Owl cupcake inspiration
Owl printable on sign in sheet and food tags
Owl Tortilla Roll Ups


Monday, June 15, 2015

May Arts Ribbon Flower Challenge

Back in May, I entered my idea for a flower using May Arts ribbon and was chosen along with 9 others for their Ribbon Flower Challenge. We got to choose the ribbons we wanted to create with this time instead of them choosing the ribbons.

I created 2 flowers to share with you using the following:


Here is how to create the flowers. The steps are the same for both, just minus a layer for the second one.

1. cut 4-5 5" circles of 471-5-16 Olive  tulle 5". I just fussy cut them. Add a little glue to the center of each one to hold them together


2. Leaving a little tail, and using a running stitch, sew along the top of 468-25-17 pink floral 2.5" and gather to create a circle. Knot the tail ends together.


3. Cut 4 flowers from 393-25-09 ivory floral sheer ribbon 2.5" and cut each flower in half (you will have one half left over)
 with the 1/2 flower, fold end to the back to create a triangle and glue. Do this to all 7 pieces

4. Crochet a flower with 471-5-16 Olive  tulle 5" using these instructions from my friend Melissa:

ch5, sl st to form a circle, 10 sc in circle, in first sc you will: *sc, 3dc, sc.* You will repeat from *-* in every other sc in circle. After completing last petal, you will sl st to the first petal to finish off.

5. Now just start layering and glueing

 To finish the flower off, I used some of the left over twine for the button


this flower was created the same as above minus the pink floral and with a smaller button.

Thank you for stopping by and be sure to go to the May Arts blog to see what the other challengers created.

Tuesday, June 9, 2015

Secret Garden Bridal Shower

This shower was for my niece-to-be and took many twists and turns along the way even to the last day! It was going to be outside in a fun flower garden space in Comstock, but it didn't look like the weather was going to cooperate, so I decided we better have it at my home.

The morning of the shower would have made a PERFECT  breakfast shower! It was gorgeous outside. As it turned out, we didn't get the rain and thunderstorms predicted, but there was wind, so I think it would have been hard to hear and napkins and plates, etc would have been blowing.

In the end, I believe everyone had a wonderful time, so it was a successful shower. It was so nice to meet her some of her family (mom, aunt, and grandma) and be able to visit before the wedding.

Stacey loves to read, so that is where the theme came from. Comstock has this fun "Friendship Patio" by their flower garden that is fun to host parties in where I was hoping it could be held.

Having it at my home, kept me busier and I forgot to take as many pictures as I would have liked, but here are a few I did get taken.

Here is the invitation that I designed for Stacey's shower. I used the Library Card Set from Cutting Cafe again. (you can view the baby invite I made using the same set HERE). The library card holder was made with digital paper from Erin Bradley Designs collection Purple Blue Orange & Green Digital Papers. The bookplate was cut from my Silhouette using Bookplate Tags from My Scrap Chick.


Flowers were cut from the ditches around us. These are just wild weeds.


We had chicken salad sandwiches on homemade buns, peach salad, cheese and homemade crackers and cheesecake: white chocolate salted caramel, triple chocolate, and white chocolate raspberry. My DIL made the salad and my SIL made the homemade crackers. Everything was delicious.
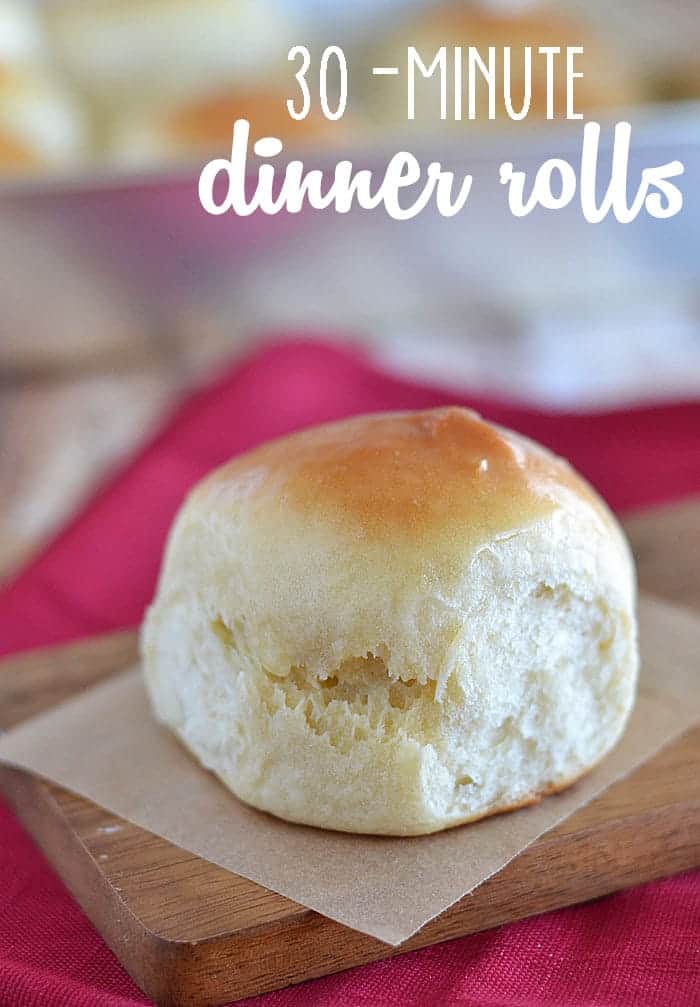


30 Minute Rolls
 

Ingredients
  • 1 cup plus 2 tablespoons warm water
  • ⅓ cup oil
  • 2 tablespoons active dry yeast
  • ¼ cup sugar
  • ½ teaspoon salt
  • 1 egg
  • 3½ cups flour (either bread flour or all-purpose will work)
Instructions
  1. Preheat oven to 400 degrees.
  2. In the bowl of your stand mixer, combine the warm water, oil, yeast, and sugar. Allow the mixture to rest for 15 minutes.
  3. Mix 2 cups of the flour, the salt, and the egg into the yeast mixture using a dough hook. Add the remaining 1½ cups flour ½ cup at a time.
  4. Shape dough into 12 balls and place in a 9x13 pan. Let dough rest for 10 minutes.
  5. Bake for 10 minutes or until tops are just golden brown.
Notes
recipe from Real Mom Kitchen

White Chocolate Caramel Cheesecake

 
Caramel Sauce:
  • 1 1/2 cups granulated sugar
  • 1 3/4 teaspoons lemon juice
  • 1 pint heavy cream
  • 4 tablespoons unsalted butter

Before I get into making the sauce, let me note that this isn't the easiest way for most home cooks to go about making caramel sauce. Melting almost pure sugar in a pan is pesky and it can burn quite easily. If you're not feeling up to attempting this part of the recipe, feel free to buy your favorite caramel sauce and warm it gently to glaze the cheesecake.

In a medium sauce pan over medium high heat (I'm using non-stick for this), combine the sugar and lemon juice. Stir with a wooden spoon until the sugar is mostly melted then set aside the spoon and swirl the pan over the heat to keep the color even throughout.

Continue to cook and swirl until it sugar turns a medium amber color. Watch it carefully, the sugar will quickly darken and should it become dark brown or black it will taste bitter and unpleasant.

When the sauce turns the right color slowly whisk in the cream. If the caramel hardens with the addition of the cream, do not worry. Just continue to add the cream and bring the mixture back to a a boil over medium heat. Continue to stir until the sugar has remelted. Allow to boil for 5 minutes then remove from heat and stir in the butter.

Pour into a heat safe container and chill until ready to use.

Crust:
  • 10 ounces graham crackers, crushed into crumbs
  • 7 tablespoons unsalted butter

Cheesecake Filling:
  • 3 8-ounce packages of cream cheese, room temperature
  • 1 1/4 cups granulated sugar
  • 1/2 cup heavy cream
  • 8 ounces good quality white chocolate, chopped
  • 5 large eggs
  • 1 teaspoon vanilla extract
  • pinch salt
  • boiling water

Pre-heat the oven to 375°F. Combine the graham cracker crumbs with the melted butter and press into the bottom and 1 1/2 inches up the side of a 10 inch spring form pan.

Bake for 10 minutes and then allow to cool completely on a wire rack.

Reduce the heat to 325°F and prepare the cheesecake batter.

Place the chopped white chocolate into a heat safe bowl and set aside. Bring the 1/2 cup of cream to a simmer over medium heat in a small sauce pan. Pour the hot cream over the white chocolate, jiggle the bowl to submerge it and allow to stand for one minute. Stir the chocolate gently until melted completely.

In your mixer with the paddle attachment, beat the cream cheese until smooth and lump free. Add the sugar and mix, scraping down the sides of the bowl as needed.

On medium speed, slowly add the white chocolate ganache. Once combined you can add the eggs, one at a time, beating on low speed until each egg is incorporated. Once you've added all the eggs, mix in the vanilla and salt and pour into your prepared pan.

Set the pan onto a couple large sheets of aluminum foil and smooth them up the sides of the pan to waterproof.

Set the cheesecake into a large roasting pan and then place in the oven. Pour the boiling water into the roasting pan, filling to about one inch (no higher than the lowest edge of aluminum foil). Allow to make at 325°F for one hour then reduce heat and bake at 300°F for an additional 60-90 minutes until the center is just set.

Remove from the oven and allow to cool completely on a wire rack. Once cool chill for at least 4 hours before serving.

To glaze, gently warm the 1 cup of the caramel sauce on the stove or in the microwave until slightly runny and then pour onto the cheesecake. Smooth the caramel over the cake and you're ready to serve.

 
INGREDIENTS
  • Crust:
  • 1½ cups graham cracker crumbs
  • ¼ cup dark brown sugar
  • 5 Tbsp butter, melted
  • 1 tsp vanilla
  • 1 4.4 oz. white chocolate bar (goes on top of pressed crust)
  • Cheesecake:
  • 3 8-oz cream cheese packs
  • ¾ cup of heavy cream
  • 2 tbs plain yogurt
  • 2 eggs
  • 1 tsp vanilla extract
  • 1½ Tbsp corn starch
  • ½ cup of white granulated sugar
  • Raspberry topping:
  • 6 oz raspberries
  • ½ cup white granulated sugar
  • 1 Tbsp lemon juice
  • 1 tsp vanilla extract
  • ½ Tbsp cornstarch
  • Topping:
  • 2 oz white chocolate, melted
INSTRUCTIONS
  1. ~ Grease a 9-inch spring form and set it aside. Preheat the oven to 325.
  2. For crust: Mix the graham cracker crumbs, sugar, melted butter and vanilla. Stir very well, until all incorporated. Press graham cracker mixture into the pan, evenly, all over the bottom and about half way up the side. Break up the chocolate into small rectangles and layer them on top of crust, evenly all over the bottom.
  3. Cheesecake:
  4. Start beating cream cheese and sugar on medium high speed until smooth, about 2 minutes.
  5. Add vanilla extract, and yogurt. Mix until combined.
  6. Add eggs, one at the time, beating after each addition. Scrape sides and bottom of the bowl and beat until all incorporated.
  7. Add corn starch and while on medium low, pour in heavy cream. Mix until all combined, scrape the sides and bottom of the bowl and mix again.
  8. Pour the cheesecake batter into the spring form with crust.
  9. Raspberry topping:
  10. In a small sauce pot, over medium heat, combine raspberries, vanilla, lemon juice and sugar. Mix well and cook, over medium heat and covered for about 10 minutes. Smash all the berries with a wooden spoon and cook for another 10 minutes on medium-low heat.
  11. Whisk in cornstarch and strain the mixture through a fine strainer to get rid of the seeds and leftover skin. The mixture should be thickened.
  12. Pour it slowly over the top of the cheesecake and carefully swirl it in to the cheesecake but don't mix.
  13. Place the spring form in the oven, inside a large roasting pan. Carefully add some hot water to the roasting pan, filling it about ½ of the way up the side of the spring form.
  14. Bake for 70-75 minutes. Sides of the cheesecake should be set but still a little jiggle in the center.
  15. Let cook completely and refrigerate until ready to serve.

Author: 
Recipe type: Dessert
Prep time:  
Cook time:  
Total time:  
 
Triple chocolate delight- chocolate cookie crust, chocolate cheesecake filling and chocolate topping garnished with chocolate curls, these cake will swept off their feet even the bigest chocoholic.
Ingredients
For the Crust:
  • 24 Oreo cookies-finely crushed
  • ¼ cup unsalted butter-melted
For Cheesecake Filling:
  • 2 lbs. cream cheese- room temperature
  • 1⅓ cups powdered sugar
  • 3 Tablespoon cocoa powder
  • 4 eggs- room temperature
  • 10 ounces bittersweet chocolate-chopped
For Chocolate Topping:
  • ¾ cup heavy cream
  • 6 oz. bittersweet chocolate-finely chopped
  • 1 Tablespoon granulated sugar
Instructions
To make the crust:
  1. Preheat oven to 350 degrees F, grease a 9-inch springform pan and set aside.
  2. Finely crush the cookies in a food processor, add melted butter and blend until it’s all moistened.
  3. Press crumb mixture onto the bottom of the prepared pan and bake for 8 minutes. Remove from the oven and set on a wire rack to cool while making the filling.
To make the filling:
  1. Melt 10 ounces bittersweet chocolate and set aside to cool.
  2. Mix cream cheese and sugar until smooth, mix in cocoa powder
  3. Add the eggs one at a time, mixing on low speed and do not overbeat it.
  4. Add melted chocolate and mix on low speed to combine.
  5. Pour the filling over the crust and smooth the top.
  6. Bake the cheesecake until the center is set and the top looks dry (about 1 hour to 1 hour 10 minutes).
  7. Cool on a wire rack for 5 minutes, then run a thin knife around the sides of the pan and set the cake in the refrigerator (uncovered), for at least 8 hours, or better overnight.
To make the topping:
  1. In a medium saucepan stir together cream, chocolate and sugar on low heat until the chocolate is completely melted and the mixture is smooth.
  2. Cool and pour over the cheesecake.
  3. When the topping is set and cooled again run a thin knife around the sides and remove the springform pan sides.
  4. This cheesecake can be prepared up to 2-3 days in advance just store covered in the refrigerator.
  5. Garnish with chocolate curls (optional).