By the time most of you read this, I will be on my way to decorate for the wedding reception and rehearsal supper (at a separate bldg.), but wanted to share some fun frugal finds with you today
*bought shirt with coupon for DH for wedding, great deal for a dress shirt
*was able to buy wedding clothes for myself including shoes and necklace with everything being on sale and then an added coupon for the shoes
*3 lb strawberries for $2.19 at Walmart
*used 40% off coupon at Hobby Lobby for new blades for my paper cutter
*downloaded book from Bookbub
*Benjamin scored gallon milk marked down to 69¢! We got several to make the cornbread and hamburger buns for the wedding.
*more strawberries for 98¢
*needed shredded cabbage for rehearsal supper and it was marked down to 79¢
*went to Sonic during happy hour while shopping
*went to Culvers (frozen yogurt) and they "accidentally made 2" of what was ordered, so gave us the free one. (good thing we had ordered small so we could eat them)
*local grocery store had fried chicken from their deli marked down to 99¢ a box. Most of the boxes were marked $8.90 ish. They had 2 breasts, thighs and wings or legs. I bought 5 of the largest weight boxes and tore the meat off of 4 to bag and freeze for shredded chicken gravy and biscuits and saved the other to eat so I would have to heat the stove/oven since it's been hot.
*needed a birthday gift for mom and found some good buys at Walmart and then a basket marked down 66% to put them all in. (got her some flavored tea, mug and pretty dish towel, then added one of my handmade dishcloths)
Friday, May 30, 2014
Tuesday, May 27, 2014
You're Tea-rific!
I have a fun Inky Antics Card to share with you today. This cute Teacup Mousies #1 Set (10952 MC) was designed by Tammy DeYoung. I colored the image with Irojiten pencils and blended with Gamsol. I used Mono Adhesive Permanent, Mono Adhesive Dots, and Mono Adhesive Removable to put all the elements together for this card.
.jpg)
.jpg)
.jpg)
Monday, May 26, 2014
Pinned It Made It Monday Week 21
We have been enjoying the rhubarb in our garden lately and I wanted to share a new recipe I tried from Pinterest called Rhubarb Cake and it uses Greek yogurt which makes it very moist.
+(900x675).jpg)
I think this dessert would be good with other fruits as well.
Rhubarb Cake
Prep Time: 20 minutes
Cook Time: 45 minutes
Ingredients (serves 12)
Cake
- 1 cup sugar
- 1 teaspoon baking soda
- 1/2 teaspoon salt
- 2 cups all-purpose flour
- 2 eggs, beaten
- 1 cup plain Greek yogurt
- 1 pound (4 cups) diced rhubarb
Topping
- 1/2 cup brown sugar
- 1/4 cup butter, softened
- 1/4 cup all-purpose flour
- 1/2 teaspoon cinnamon
Instructions
- Heat oven to 350 degrees. Grease and flour a 9 x 13 inch pan.
- In a large bowl, stir together sugar, baking soda, salt and 2 cups flour. Stir in the eggs and Greek yogurt until smooth, then fold in the rhubarb. Batter will be very thick. Pour into pan and spread evenly.
- In a small bowl, stir together brown sugar and butter until smooth. Stir in 1/4 cup flour and cinnamon until the mixture is crumbly. Then sprinkle the mixture on top of the cake.
- Bake until a toothpick inserted in the center comes out clean, about 45 minutes. Serve with whipped cream, if desired.
Saturday, May 24, 2014
Hopping with Pretty Paper Pretty Ribbon
The members of the Pretty Paper, Pretty Ribbon's Design Team and the Tombow Design Team have joined together to create beautiful projects featuring different files & adhesives. If you came here from Jeanne's blog, you are in the right place. If you just stumbled upon this post and would like to start from the beginning, please visit Lisa's blog. This week we are making projects that are using Pretty Paper, Pretty Ribbons Files and Tombow Adhesives.
.jpg)
.jpg)

For a chance to win, you MUST be a follower of each blog and leave a comment on EACH
blog. For extra chances, you can also "LIKE" Pretty Paper, Pretty Ribbons on Facebook and Tombow USA Facebook page. The winners of the giveaways will be chosen on Tuesday May 27, 2014
Now it's time to head over to Leah's blog. Here is a list of the blog hop order in case you need it.
Lisa ~ http://prettypaperprettyribbons.blogspot.com/
Leanne ~ http://www.createdbyleanne.blogspot.com/
Marie~ http://mariebrowning.wordpress.com/
Melisa ~ http://www.melisascraftycreations.blogspot.com/
Jennie ~ http://earthyscrap.blogspot.com/
Jeanne ~ http://www.jeannespapercrafts.com/
Debbie ~ http://debbiedee.blogspot.com/
Leah ~ http://leahschaeffer.blogspot.com/
Melissa ~ http://www.inkclinations.blogspot.com/
Tombow Blog ~ http://blog.tombowusa.com/
I am linking this up to DL ART
It's all about a wedding here in the Fisher household. My oldest will be getting married next weekend and I knew these banner files from Pretty Paper, Pretty Ribbon would come in handy. I used the Simple Banners Shapes Cutting File and enlarged the short banners until it measured 2" in width to make my banners. I had a bunch of political junk mail from all the candidates running recently and used them for my base as they were a lightweight chipboard. I used Mono Adhesive Permanent to adhere the polka dot paper to the junk mail and then Xtreme Adhesive to adhere that to the burlap.
After cutting the burlap, I adhered pieces of a paper lace doily to the top of the banner pieces with Mono Adhesive Dots, then ric rac & jute bows with Xtreme Adhesive. Letters were cut with my Cricut using Plantin Schoolbook cartridge and adhered with Mono Adhesive Dots . (I thought that was an appropriate font since Kassy is a teacher Ü) I just taped the banner pieces to a string of jute so that they can be removed later and added to a scrapbook page.
The banner was then tied to 2 pieces of dowel that I cut to fit the basket. Be sure to watch my blog for another project using PPPR's banner file for another part of the wedding.
Now on to the cool prize that you can enter to win:
$20.00 Gift Card to Pretty Paper, Pretty Ribbons
Tombow Adhesives Bundle:
For a chance to win, you MUST be a follower of each blog and leave a comment on EACH
blog. For extra chances, you can also "LIKE" Pretty Paper, Pretty Ribbons on Facebook and Tombow USA Facebook page. The winners of the giveaways will be chosen on Tuesday May 27, 2014
Now it's time to head over to Leah's blog. Here is a list of the blog hop order in case you need it.
Lisa ~ http://prettypaperprettyribbons.blogspot.com/
Leanne ~ http://www.createdbyleanne.blogspot.com/
Marie~ http://mariebrowning.wordpress.com/
Melisa ~ http://www.melisascraftycreations.blogspot.com/
Jennie ~ http://earthyscrap.blogspot.com/
Jeanne ~ http://www.jeannespapercrafts.com/
Debbie ~ http://debbiedee.blogspot.com/
Leah ~ http://leahschaeffer.blogspot.com/
Melissa ~ http://www.inkclinations.blogspot.com/
Tombow Blog ~ http://blog.tombowusa.com/
I am linking this up to DL ART
Wednesday, May 21, 2014
More Fun Blocks
.jpg) I am soooo excited! Regina has designed more blocks and accessories for Cutting Cafe called The Block-Template and Cutting File! If I had time, I could do another whole week of these. I chose to create my project using the tall block option. I suggested this to Regina and am so excited that she created this size. I have so many fun ideas, but time is short right now as we prepare for a wedding. Ü
I am soooo excited! Regina has designed more blocks and accessories for Cutting Cafe called The Block-Template and Cutting File! If I had time, I could do another whole week of these. I chose to create my project using the tall block option. I suggested this to Regina and am so excited that she created this size. I have so many fun ideas, but time is short right now as we prepare for a wedding. ÜI picked some pretty papers by Kaiser Craft (front and back) & My Mind's Eye (sides). Then I just got out my "Michelle" box and started decorating it with goodies from my box.
.jpg)
side note: My friend Michelle Pearson and I used to do a lot of swapping and one time she sent goodies in this strong little box that is just perfect for storing little embellishments. It is filled with a few goodies that I still have that she sent (the white vintage buttons I used) as well as my crocheted flowers (need to get to making more of those), as well as left over embellishments from previous projects (paper flowers, stick pin, tickets, brad, & paper doily).
To make the top and bottom a bit stronger, I cut a piece of scrap cardstock to fit that area and layered it to the inside before putting the box together. The rest I just cut pieces to fit the sides and adhered with Xtreme adhesive. All the embellishments were layered with Xtreme and/or Power Tabs.
Be sure to stop by the blog tomorrow and leave a comment for a chance to win 3 files of your choice.
I am linking this up to DL ART
Monday, May 19, 2014
Pinned It Made It Monday week 20
For today's pins, it's all about asparagus. We also decided we need LOTS more asparagus planted. Ü These recipes were "okay". I would eat them again, but not my favorite. I just like asparagus baked with olive oil, salt and pepper as I really like asparagus.
Wrapped With Bacon...I love bacon, but it was so over powerful (and I only used one strip instead of two like the recipe called for) that you couldn't really taste the asparagus.
.jpg)
Creamy Baked Asparagus and Aged Cheddar
...again this was good, but not great..jpg)
Friday, May 16, 2014
Frugal Friday 5-16
*We've been eating asparagus and rhubarb.
*Used 40% off coupon at Hobby Lobby for chalk spray paint for rehearsal decoration idea (I'll be sharing the rehearsal pics in June...hopefully I remember to take pics!)
*cut crab apple blossoms to bring inside in a vase. so pretty and just makes me smile
*Three 8 oz blocks of cheese for 99¢ each. We like snacking on cheese and crackers and sometimes that is our supper, so this was a great buy for us.
*Earned $10 in swagbucks
*downloaded free books from Bookbub
*rec'd a free book from Blogging for Books to review
*downloaded free cutting files from Miss Kate Cuttables and Images by Heather
*saved a shirt by searching how to remove oil stains and it worked
*used free Amazon swagbucks to order supplies for decorating rehearsal supper
*took food with us when we attended Benjamin's graduation. Trip is 4.5 hours away. We only ate one meal out and fed 4 people on $11...not bad for 2 days.
*Benjamin gave us 2 boxes of crackers and several boxes of granola bars that he had gotten free. These will come in handy for quick eating/energy while we are busy getting ready for a wedding.
*Benjamin also brought some leftover food from his apartment to share with us.
*been being frugal and food shopping VERY little and using what is in the freezer/pantry, etc.
*downloaded book from Bookbub
*checked books out from library
*watched movies on Netflix (youngest has a subscription)
*3 lb bag of boneless, frozen chicken breast for $4.99
*was at Walmart right when they were marking down (and loading fresh) strawberries from $1.88 to 98¢!! Bought 7 of them. Cleaned some to take with us when we went to graduation, froze some and made a strawberry salad and strawberry limeades.
Tuesday, May 13, 2014
BFB The Soda Fountain

Blogging for Books now has cook and crafting books and my latest book from them that I chose is The Soda Fountain by Gia Giasullo and Peter Freeman. I love everything about this book!
We've toyed with the idea of an ice cream/tea/coffee shop for a few years but it's never really worked out and now that I have this book, I'm wanting to open one even more. The history and recipes shared are priceless!
Here are some fun excerpts:
*a few recipes that did NOT stand the test of time in soda fountains:
Celery Egg Tonic
Pru-Nut Malted Milk (prunes and walnuts)
Yeast Milkshake
Caramel Cream Sundae on a bed of lettuce
*one of the weirdest fountain menu item:
Egg & Coffee (together...mixed)
*a few from the earliest fountain lunch menus:
American Cheese and Peanut Butter
Peanut butter, Sardine, and Potato Salad on Rye
**Now I love peanut butter, but the above sounds gross!
Some fun Soda Fountain lingo:
"Sweet Alice"....milk
"Adam's Ale"...water
"Belch Water"...seltzer water
"Belly Chokers"...donuts
"Huddle Soda"...one soda, 2 straws
*the first "ice cream soda" didn't have ice cream, just ice, cream, and soda
fun soda names:
Betty Boop
Tarty Pants
Purple Cow (I actually had one of these ...my first...at a soda fountain when I lived in Michigan)
Hot Flash...coffee or hot chocolate and ice cream...first customers to order this were 3 teenage boys. LOL!!
These are just a few of the fun facts in this book. If you like this type of thing, you definitely need to get this book. I can't wait to make some of the recipes in it. I will be sharing here on my blog when I do. I'm thinking the first one is going to be Vanilla Cream Soda. My boys love cream sodas, so this one sounds like a good one to start with. Have to find some citric acid to make it.
I received this book for free from Blogging for Books for this review.
Quick and Easy Gift Idea
Hello! As you read this, my oldest son will have just graduated from college (WHERE does the time go???) AND will be getting married the 31st of this month, so we are super busy here as I am blessed to be able to help them out quite a bit with the wedding plans.
So, it's all about quick and easy this month as I need to have all my posts pre-posted. We are doing all the food for the wedding as well as decorate for wedding, rehearsal, etc.
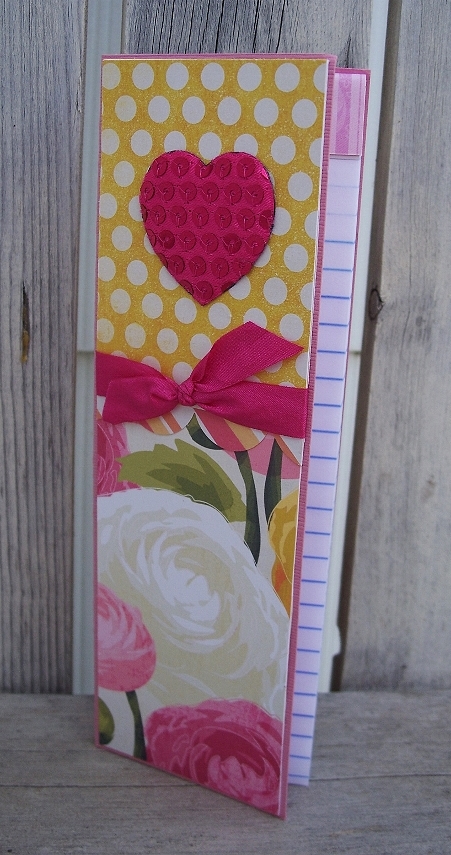
Here is a fun gift that is perfect for Mother's Day (I know it's already past, but what I gave) and for graduation gifts. It's another of my mini notepads covered. The fun puffy, sequined heart is from May Arts. It has a sticky back, so can't get any easier than that!
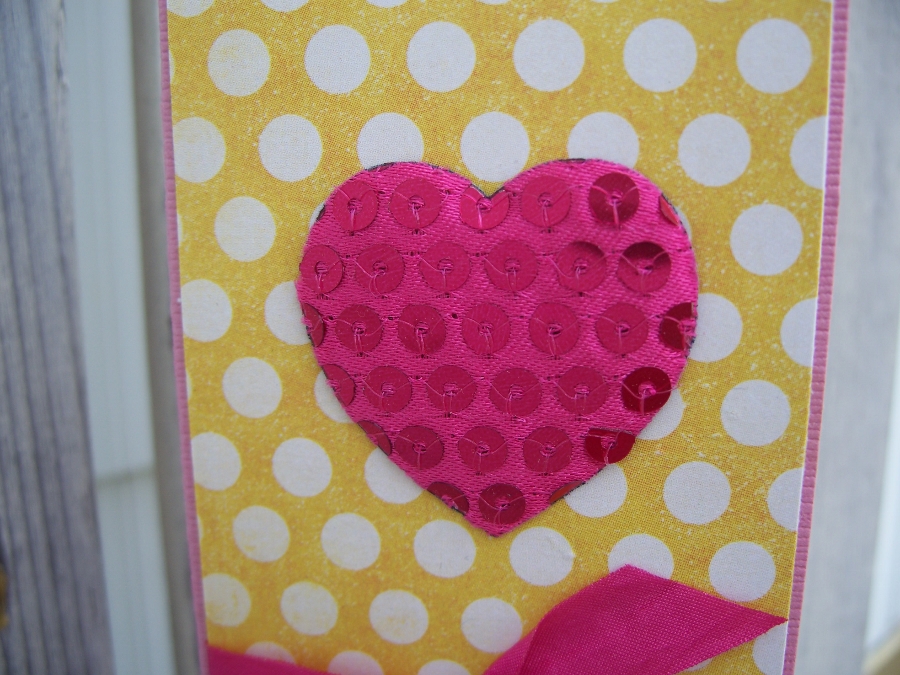
I used Tombow's Xtreme Adhesive for all the construction of the notepad cover.
I am linking this up to DL ART
Monday, May 12, 2014
Pinned It Made It Monday Week 19
Good Morning! The weather is so crazy here! The past week we moved our youngest home from college and on that day our oldest was getting 8" of snow. Then two the next day we headed to the other side of the state to attend our oldest's Honor Program and College graduation the next day. Got some sun while having a picnic on the porch, but had to come home a day early as another snowstorm was coming in. The kids got caught in it a bit Sunday morning, but are all home safe. NOW it's suppose to snow here today! I had all my winter clothes packed away and had to pull a few out yesterday.
Okay, on to something a bit more sunny....I made these adorable bee cupcakes for our April Ladies' Night Out group. We had a bee theme and everyone one loved these. They were so much fun to make!
.jpg)
I used THIS pin for the inspiration to make the bees on the cupcakes (but not the recipe). Then I made THESE honey cupcakes, THIS recipe for honey meringue, and THIS recipe for salted caramel drizzle (I thought drizzling honey might be too over-powering and the caramel was the perfect complement to the honey!).
.jpg)
The cupcakes were super yummy! Definitely a keeper. I used almond slices for the bees and a sunflower seed for its stinger which you can barely see in the photo above. Then melted chocolate to make the eyes and stripes on the bee. To make the bees see recipe below.
.jpg)
My friend had picked up a tiny bear at a garage sale and showed it to me and asked if I could possibly find some. I did some googling and found these cute little bears. Typed out the Bible verse, covered it with clear contact paper and adhered them all to the front.
.jpg)
I also found these adorable bee stickers by JoLee on Amazon to add to the top. These are the favors that all the ladies rec'd.
.jpg)
HONEY CUPCAKES
a recipe by Lauren Kapeluck
{makes 1 dozen cupcakes}
For the cake:
1 stick butter, room temperature
3/4 cup sugar
2 eggs
1 1/2 cups all-purpose flour
1 tsp baking powder
1/2 tsp salt
1/2 cup buttermilk
1/4 cup honey
1 tsp vanilla
- Preheat oven to 350 degrees and line 12 cup muffin pan with cupcake liners.
- In medium bowl mix together dry ingredients: flour, baking powder and salt, set aside.
- In small bowl mix together wet ingredients: buttermilk, honey and vanilla, set aside.
- In bowl of stand mixer cream butter and sugar on medium speed until combined.
- Add eggs, one at a time beating well after each addition and scraping down sides of bowl as needed.
- Gradually add the dry and wet ingredients, alternating starting and ending with dry ingredients and mix until combined.
- Using ice cream scoop fill cupcake liners about 2/3 full.
- Bake for 18-20 minutes.
- Let cupcakes cool in pans for 5 minutes, then remove to wire rack to finish cooling.
- Once cupcakes are completely cool, ice.
Simple Meringue Frosting Recipe
- 1/2 cup honey
- 2 egg whites, eggs at room temperature will be easier to separate
- 1/4 teaspoon sea salt
- 1/2 teaspoon vanilla (optional) **I used real vanilla Aaron brought me from Haiti
Simple Meringue Frosting Directions
This recipe takes less than 10 minutes, but it does have to be done all at once. The honey must be poured into the egg whites while it is still hot or it will solidify. The hot honey also cooks the egg whites.- Heat honey in a saucepan over medium heat 5-10 minutes; until mixture bubbles and darkens.
- Meanwhile, separate two eggs, being very careful to avoid getting any yolk in with the whites.
- Add the salt to the egg whites.
- Put two whites in a stand mixer with a whip attachment, or use a hand held mixer and a bowl held steady by a helper.
- Mix starting on medium.
- As the eggs start to froth, turn the mixer up to high.
- At the same time you turn the mixer up to high, start pouring the honey in with a thin steady stream, taking about 1 minute to pour in the hot honey.
- Continue mixing on high as the frosting fluffs and thickens and is cool enough to touch, 2-3 minutes.
- Add the optional vanilla while mixing.
- Use a spatula or butter knife to frost cupcakes, or spoon into a piping bag and pipe onto cupcakes for a more decorative look. The icing goes on the cupcakes or cake easiest if used within a couple hours of making.
{courtesy of healthhomehappy}
HOMEMADE CARAMEL SAUCE:
- 1/2 cup granulated sugar
- 4 tbls water
- 1/2 cup heavy cream
- 2 tsp vanilla extract
- 1/2 cup granulated sugar
- 4 tbls water
- 1/2 cup heavy cream
- 2 tsp vanilla extract
1. COOK: In a small saucepan, briefly stir together sugar and water and bring to a boil. Continue cooking on medium-high heat, without stirring, until the mixture turns DARK amber in color. About 7-8 minutes.
2. ADD: Remove sugar and water mixture from heat and slowly add in cream and vanilla. Stir with a wooden spoon until mixture is completely smooth. Then set aside until it is cool to the touch. About 30 min.
2. ADD: Remove sugar and water mixture from heat and slowly add in cream and vanilla. Stir with a wooden spoon until mixture is completely smooth. Then set aside until it is cool to the touch. About 30 min.
{courtesy of fishstitch}
HONEY BEES
1/4 cup honey
1/4 cup peanut butter
1/2 cup dried milk
mix together and refrigerate, then form into bees
this recipe I came up with after viewing several and working out a ratio to make it simple and work for my bees
Sunday, May 11, 2014
Cutting Cafe Mother's Day Sale
In appreciation of Mother's Day we are having our
......... BEST SALE EVER AGAIN............
ANY 5 FILES FOR ONLY $5.00
OR
ANY 10 FILES FOR ONLY $10.00
THAT IS ONLY $1.00 A SET
go HERE for more info
Wednesday, May 7, 2014
Tulip Time on Cutting Cafe
This first post with the new Cutting Cafe DT is all about tulips! We had 3 different tulip files to work with and I chose the Tulip Shaped Card Set for the tulips and the sentiment.
.jpg)
I have an even more appreciation for my Silhouette as the cord died and I made my project the old fashioned way...cutting by hand. So thankful the images were easy to cut. Went a different direction though as I planned to use the basket tulip file, but there was no way I was cutting all those squares out by hand. LOL {side note: called Silhouette and they are sending me the part for free!! YAY!} second side note:{sentiment was added after I had taken this picture below}
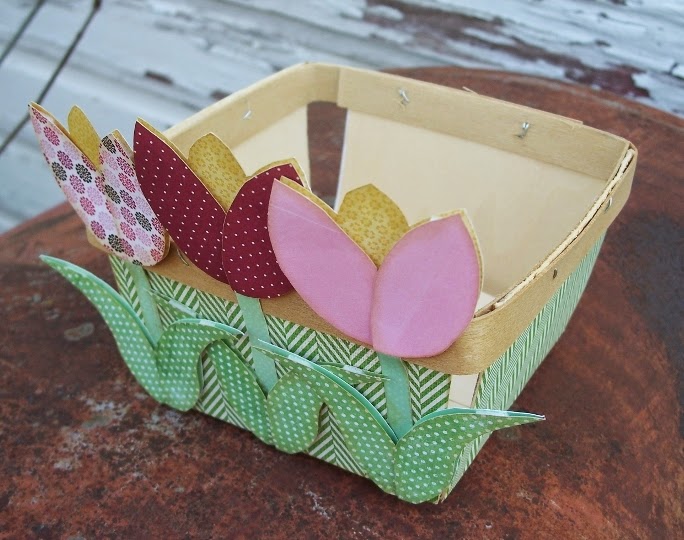
I had these fun little baskets that I had purchased from a tractor supply store (not sure why they were there, but loved the bargain. Ü I just covered the sides with designer paper and then cut the tulips and mounted them to the front. Then I found these fun Little Debbie Tulip Cakes, so I will put one of those and some other goodies into the box for a fun little gift. (BTW, I also see they have butterfly cakes too, so will be doing something fun with them as well.)

Since it's all about tulips, I thought I'd share a pictures of my tulips growing right now (and yes I see I need to clean out the dead leaves. LOL!

And as always, be sure to stop by the blog tomorrow and leave a comment for a chance to win 3 files of your choice.
I am linking this up to DL ART
I have an even more appreciation for my Silhouette as the cord died and I made my project the old fashioned way...cutting by hand. So thankful the images were easy to cut. Went a different direction though as I planned to use the basket tulip file, but there was no way I was cutting all those squares out by hand. LOL {side note: called Silhouette and they are sending me the part for free!! YAY!} second side note:{sentiment was added after I had taken this picture below}
I had these fun little baskets that I had purchased from a tractor supply store (not sure why they were there, but loved the bargain. Ü I just covered the sides with designer paper and then cut the tulips and mounted them to the front. Then I found these fun Little Debbie Tulip Cakes, so I will put one of those and some other goodies into the box for a fun little gift. (BTW, I also see they have butterfly cakes too, so will be doing something fun with them as well.)
Since it's all about tulips, I thought I'd share a pictures of my tulips growing right now (and yes I see I need to clean out the dead leaves. LOL!
And as always, be sure to stop by the blog tomorrow and leave a comment for a chance to win 3 files of your choice.
I am linking this up to DL ART
Monday, May 5, 2014
Blog Hop with Michele Kovack
Today the Tombow DT is hopping with guest designer Michele Kovack.
I created this card using Inky Antics 10976MC Flower Turtle Set and Tombow's Irojiten Colored Pencils, Mono Adhesive Dots and Mono Adhesive Permanent.


In order to enter to win the prize, please comment on all the Design Team’s projects this week! Now it's time to head over to the very talented Melissa Cash.
I created this card using Inky Antics 10976MC Flower Turtle Set and Tombow's Irojiten Colored Pencils, Mono Adhesive Dots and Mono Adhesive Permanent.
This week’s prize will include:
In order to enter to win the prize, please comment on all the Design Team’s projects this week! Now it's time to head over to the very talented Melissa Cash.
Pinned It Made It Monday Week 18
This week's pin was one I wasn't so sure I was going to like, but it looked so good I wanted to give it a try.
Snickerdoodle Cookie Bars. Snickerdoodles are my favorite cookies and sometimes there are recipes out there that just ruin them, but this wasn't one of them.
.jpg)
I was needing a dessert to take to a funeral, so decided that would be a good time to make them. I ended up coming home with 1/2 pan as there were so many desserts and not many people at the dinner. That was okay, because then we got to enjoy them. If you like snickerdoodles, I highly recommend this recipe.
Snickerdoodle Cookie Bars. Snickerdoodles are my favorite cookies and sometimes there are recipes out there that just ruin them, but this wasn't one of them.
I was needing a dessert to take to a funeral, so decided that would be a good time to make them. I ended up coming home with 1/2 pan as there were so many desserts and not many people at the dinner. That was okay, because then we got to enjoy them. If you like snickerdoodles, I highly recommend this recipe.
Snickerdoodle Cookie Bars
Ingredients
- 1 cup butter or shortening (shortening gives a better texture)
- 1½ cups sugar
- 3 eggs
- ¼ cup sour cream
- 2 cups flour
- 1 tsp baking soda
- 1 tsp cream of tartar
- 1 tsp baking powder
- ½ teaspoon salt
- ⅓ cup sugar
- 1 Tbsp cinnamon
Instructions
- Cream shortening and sugar.
- Add eggs, one at a time, scraping down the bowl between eggs.
- Mix in sour cream.
- Combine flour, baking soda, cream of tartar, baking powder and salt.
- Mix into shortening/sugar mixture.
- In a separate, small bowl, combine ⅓ cup sugar and cinnamon.
- Sprinkle half the cinnamon sugar mix into a 9X13 pan.
- Spread batter on top.
- Top with remaining sugar mixture.
- Bake 350 degrees for 25-30 minutes.
- You don't want this too much like cake, so opt for less time if you need to.
Recipe by Frugal Antics of a Harried Homemaker at http://frugalanticsrecipes.com/2010/11/snickerdoodle-cookie-bars/
Friday, May 2, 2014
Frugal Friday 5-2
*from Freebies Frenzy rec'd...
Emergen-C samples
Eucerin Lotion
*downloaded books for free onto my Kindle from Bookbub
*checked books out from the library
*rec'd a free 15yd roll of lace for a contest I entered
*Italian Dressing marked down to 70¢
*used $1 off coupon on batteries
*$2 off coupon for Easter M & M's marked down
*earned $15 in Swagbucks and used it for Amazon dollars
*bought milk on Monday for an extra 50¢ off
*bought 6 plastic tablecloths at Dollar General for 30¢ each. They rang up as $1, but I told that gal that the sign said 30¢, so they had to sell it to me for that. Will use them for our monthly ladies nite out gatherings.
*I didn't have enough glasses for everyone for the shower I hosted so used mason jars. So much more fun to drink out of anyway
*bought a block of cheese marked down to 99¢
*32 oz plain yogurt marked down to 99¢
made sandwiches to take when we were going to be in town over supper time
Exciting News
Even though my "term" was up on Cutting Café, I have been invited to join in again and this time "forever"!! I am sooo excited. There is going to be a change in DT posts where together we will post twice a week, but there are so many awesome files out there that Regina has designed, so I am going to continue to post every week. This will give me a chance to create with those files that are on my "back burner" so to speak.
You can go HERE to read all about it and to see who else will be joining me. Our first DT post will be May 7th, so stay tuned! It is going to be a spring-y filled inspiration post!
You can go HERE to read all about it and to see who else will be joining me. Our first DT post will be May 7th, so stay tuned! It is going to be a spring-y filled inspiration post!
Subscribe to:
Posts (Atom)