Saturday, May 30, 2015

Pinterest Recipes

I haven't been posting this week, but I've been super busy working on showers for "S", "J", & "H". The shower for "S" is next Saturday, for "J" the next Tuesday, and then for "H" the Sunday after that. I've also been asked to teach some crafts at a nearby camp, so also working on kits for the first class this coming Tuesday.

I don't have any photos to share, but I have done some baking/cooking inspired by Pinterest so thought I'd just pop in and share those links. We've also eaten all the wild asparagus growing behind our house and planted 40 more plants, Hopefully next year we will be able to eat off of what we planted last year. The rhubarb has also been growing in abundance. I'll share some recipes I've made from it so far next week with you.

French Bread
Pinterest link
FABULOUS FRENCH BREAD
Easy and amazing French Bread!

Prep Time
45 min
Cook Time
20 min
Total Time
1 hr 5 min
INGREDIENTS
  1. 1 cup boiling water
  2. 1/3 cup warm water
  3. 1 Tablespoon active dry yeast
  4. 2 Tablespoons sugar
  5. 1 Tablespoon salt
  6. 1 Tablespoon shortening ( I used butter-flavor Crisco)
  7. 1 cup cold water
  8. 5-6 cups all-purpose flour
  9. 1 egg
INSTRUCTIONS
  1. Preheat oven to 170 degrees F. Fill a glass measuring cup with 1 cup of water. Place in microwave and heat for 3 minutes, or until water is boiling.
  2. In another glass measuring cup, fill it with 1/3 cup warm water. Sprinkle the 1 Tablespoon of yeast over the water. With a fork, stir yeast into the water until yeast is completely dissolved.
  3. Pour the sugar, salt and shortening into the bowl of your stand mixer. Using a fork, mash these ingredients together. Pour the 1 cup of boiling water over the shortening mixture in the stand mixer. Add the 1 cup of cold water into the mixer. Then pour in the yeast/water mixture.
  4. Add 3 cups of flour into the mixer, and using the dough hook, turn mixer on low speed. With the mixer still on, slowly add in the remaining 3 cups of flour, 1 cup at a time. Once all 6 cups are in, turn speed to medium and let the dough mix for 6-8 minutes. The dough should be nice and elastic. Be careful not to over-flour. I used all 6 cups, but would not use any more than that.
  5. Once the dough is mixed, let it rest in the bowl for 5 minutes.
  6. Spray a large cookie sheet with non-stick spray. After the dough has rested in the bowl, dump it onto the greased cookie sheet.
  7. Take a sharp knife, spray it with non-stick spray, and cut dough into 3 equal pieces. Then let it rest again for 5 minutes. (These resting periods for the dough is needed, so please do it and be patient! It’s worth the wait )
  8. To shape the dough before baking: Take one section of dough and spread it out into a rectangle. Just use your fingers, you don’t need a rolling pin. Fold one long end up over half of dough, then fold the other half over that one. Then fold each side up over each other, then turn the loaf over so it is seam side down.
  9. Use your fingers to tuck seams down underneath the loaf and shape it. Repeat with the other 2 pieces of dough. Once all 3 sections of dough are shaped cut 3 angled 1/2 inch slits onto the tops of dough.
  10. Crack the egg into a bowl and whisk with a fork until frothy. Spread the egg over the tops of each loaf, making sure to get inside the slits.
  11. Place the loaves into the oven and let them rise for about 15 minutes (while the oven is on 170 degrees F.) Then turn oven up to 400 degrees F (while the loaves are still inside) and bake for 15-20 minutes, or until the tops are golden brown and crisp. Turn the oven down to 350 degrees F. and bake for an additional 10 minutes.
  12. Remove the loaves from the baking sheet and allow them to cool a bit before slicing them.
  13. Enjoy! ♥
NOTES
  1. Yields: 3 Loaves


Swedish Meatballs
Pinterest link
SWEDISH MEATBALLS
Prep Time15 minutes
Cook Time25 minutes
Total Time40 minutes
Yield4 servings
INGREDIENTS
  • 2 tablespoons olive oil, divided
  • 1 onion, diced
  • 1 pound ground beef
  • 1 pound ground pork
  • 1/2 cup Panko*
  • 2 large egg yolks
  • 1/4 teaspoon ground allspice
  • 1/4 teaspoon ground nutmeg
  • Kosher salt and freshly ground black pepper, to taste
  • FOR THE GRAVY
  • 1/4 cup unsalted butter
  • 1/3 cup all-purpose flour
  • 4 cups beef broth
  • 3/4 cup sour cream
  • Kosher salt and freshly ground black pepper, to taste
  • 2 tablespoons chopped fresh parsley leaves
INSTRUCTIONS
  • Heat 1 tablespoon olive oil in a large skillet over medium heat. Add onion, and cook, stirring frequently, until onions have become translucent, about 2-3 minutes.
  • In a large bowl, combine ground beef, ground pork, Panko, egg yolks, allspice, nutmeg and cooked onion; season with salt and pepper, to taste. Using a wooden spoon or clean hands, stir until well combined. Roll the mixture into 1 1/4-to-1 1/2-inch meatballs, forming about 24 meatballs.
  • Add remaining 1 tablespoon olive oil to the skillet. Add meatballs, in batches, and cook until all sides are browned, about 4-5 minutes. Transfer to a paper towel-lined plate.
  • To make the gravy, melt butter in the skillet. Whisk in flour until lightly browned, about 1 minute. Gradually whisk in beef broth and cook, whisking constantly, until slightly thickened, about 1-2 minutes. Stir in sour cream; season with salt and pepper, to taste.
  • Stir in meatballs and cook, stirring occasionally, until heated through and thickened, about 8-10 minutes.
  • Serve immediately, garnished with parsley, if desired.
NOTES
*Panko is a Japanese-style breadcrumb and can be found in the Asian section of your local grocery store.

Adapted from Jo Cooks
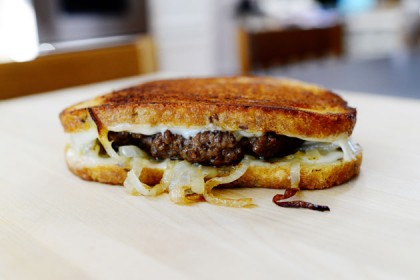

Patty Melt
Pinterest link
recipe via Pioneer Woman

Patty Melts

Prep Time:
 
 
Cook Time:
 
 
Difficulty:
 Easy
 
Servings:
 4

Ingredients

  • 1 stick Butter
  • 1 whole Large Onion, Halved And Sliced
  • 1-1/2 pound Ground Beef
  •  Salt And Pepper, to taste
  • 5 dashes Worcestershire Sauce
  • 8 slices Swiss Cheese
  • 8 slices Rye Bread

Preparation Instructions

In a medium skillet, melt 2 tablespoons of butter over medium-low heat. Throw in the sliced onions and cook slowly for 20 to 25 minutes, stirring occasionally, until the onions are golden brown and soft.
In a medium bowl, mix together the ground beef, salt & pepper, and Worcestershire. Form into 4 patties.
Melt 2 tablespoons butter in a separate skillet over medium heat. Cook the patties on both sides until totally done in the middle.
Assemble patty melts this way: Slice of bread, slice of cheese, hamburger patty, 1/4 of the cooked onions, another slice of cheese, and another slice of bread. On a clean griddle or in a skillet, melt 2 tablespoons butter and grill the sandwiches over medium heat until golden brown. Remove the sandwiches and add the remaining 2 tablespoons of butter to the skillet. Turn the sandwiches to the skillet, flipping them to the other side. Cook until golden brown and crisp, and until cheese is melted.
Slice in half and serve immediately!

My Favorite Brownies
Pinterest link
Recipe via Culinary Couture
Yield: One 8x8-inch pan (16 squares) 

Ingredients:

3/4 cup all-purpose flour
1/3 cup plus 3 tablespoons unsweetened cocoa powder
1/4 teaspoon + 1/8 teaspoon baking powder
1/4 teaspoon + 1/8 teaspoon salt
3/4 cup canola oil (or vegetable oil)
1 and 1/2 cups granulated sugar
1 and 1/2 teaspoons vanilla extract
3 eggs, room temperature


Directions:

Preheat oven to 325 degrees F. Lightly spray an 8x8-inch glass baking dish with nonstick spray, then line with parchment paper, leaving an overhang on two opposite sides. Lightly spray again and set aside.

In a medium sized bowl, whisk together flour, cocoa powder, baking powder, and salt. Set aside.

In another bowl, using an electric hand mixer, beat together oil, sugar, and vanilla until light and fluffy. Add eggs and beat until well blended. Using a spoon, gradually stir in dry ingredients, until completely combined. 

Pour batter evenly into prepared pan. Bake for 30-40 minutes, or until a toothpick inserted into the center comes out with a few moist crumbs. Transfer to a wire rack to cool completely before cutting into squares.

Note: If you are using a metal baking pan, increase oven temperature to 350 degrees.


Friday, May 22, 2015

Birthday Banner

My cousin that ordered the birthday cards for her sweet soon to be 1 yr old's birthday party (you can see the invite here), also asked if I could make a birthday banner for Miss Brittan.

For the Happy Birthday Brittan lettering,  I used the Freak Show font and cut it on my Silhouette. For the Bracket shape, I used a SVG File that you can download for free from The Project Girl HERE.( Scroll down on her post and you will find a link to the file she is sharing.)


Thursday, May 21, 2015

Another Husker Inspired Shower

This shower went in a completely different direction than originally planned. LOL The bride and groom's colors are purple and mint and they shared that they like pizza and pasta. It needed to be on a Sunday right after church as that was the only time the busy couple was available. After talking to the bride to be, we decided on an Italian theme, with a pizza and pasta potluck, then the hostesses would do some Italian desserts.

Changes....the Sunday was going to be after a wedding at the church and a good share of those coming to the shower would be at the wedding. The groom's mother wanted to provide the pizza and ice cream for sundae's and really liked the Husker invites I made for another shower and suggested I just go with a Husker theme as both the bride and groom to be are huge fans.

So we just did a switch with the hostessses making pasta dishes and providing toppings for the ice cream. It was a huge hit.

Unfortunately....I couldn't find my camera (It was in the car!!!), so used my son's phone and only got a few pictures before everyone got there, then got so busy setting everything out that I forgot to take pictures of the food. So just imagine 5 kinds of pizza from Pizza Hut and traditional lasagne, chicken alfredo lasagne, crock pot pizza pasta, gluten free pasta, and gluten free chicken bacon ranch pizza. I will post my two recipes at the bottom.

For toppings, we had homemade marshmallow, homemade chocolate, homemade strawberry, caramel, butterscotch, nuts, and crushed oreos.

Here are the few pics I did take...


Wednesday, May 20, 2015

Treat Cup Cards

Treat Cups are being featured by the Cutting Café Design Team this week. Regina has designed 7 different Treat Cup cards, and has a video tutorial that is very helpful in putting these together. They are a lot easier than you would think and so fun to make!


I chose to use the gumball machine image and was inspired by THIS vintage yellow gumball machine. I chose the yellow polka dot paper for my background sine it had gray lettering on it to go with the silver cardstock I used for the gumball machine. The background of the silver is smooth and the other pieces are a textured silver.

I didn't have any gumballs to put in it, but had some M & M's left over from making monster cookies yesterday, so just picked out some yellow ones and it worked.

Be sure to visit the Cutting Cafe Blog on the 7th and 21st of every month to see the design team's projects in which you can leave a comment to be entered into a drawing to win 3 FREE sets of your choice from the online store.

Tuesday, May 19, 2015

BFB Reservations for Two by Hillary Manton Lodge


  • More Info
  • Author Bio
  • I was excited to see the second book in the Two Blue Doors series available on BFB: Reservations for Two by Hillary Manton Lodge.


    The story continues as Juliette’s current life working to open a restaurant with her brother and her travels abroad to learn of her grand-mère’s WWII past. Just like the first book, this one is filled with recipes that sound delicious.


    Juliette's life is complicated by her love interest who lives across the states from her and doesn't believe that things can work out for them to get together.


    Reservations for Two is another wonderful story filled with romance, suspense, a dialogue that makes you feel like you are right there experiencing what is going on and yummy recipes.


    Even though this book starts where book 1 left off, it could easily stand on it's own.


    I received this book from Blogging for Books for this review

    More Dishcloths

    Here is another set I made for a bridal shower that I didn't host for a local gal. In fact I couldn't attend her shower as I was hosting another one that day. Her colors are plum, sage, and kraft brown. I couldn't find any plum colored cotton yarn, but thought that this went pretty together and really they are for washing dishes, so it doesn't matter that much. Ăś


    Thursday, May 14, 2015

    Sunflowers and Daisies Bridal Shower

    Last week's bridal shower was sunflowers and daisies with a bit of rustic country charm. The bride to be's colors were sunflower yellow and pomegranate...a very pretty color combo!

    To start off, these are the invites I created for her. I googled bridal shower invites to get some ideas for wording so that it would be different from the just "you are invited". I really liked how this one looked with wording to the left to peek above the pocket and then to the right hidden in the pocket.  It just happened to work out that way and I love happy surprises like that!

    The card "base" is actually a paper lunch sack! This came about because I had run out of white cardstock (I've already gone through one ream...150 sheets just doing showers invites and decorations!) and I wasn't going to drive 1.5 hrs to get more (the closest Walmart). Since the theme was rustic country, I decided why not use paper sacks and I love how it turned out.

    The yellow check paper had daisies on it, so that was perfect and the pinkish red paper fit the pomegranate color of her color choices, but I needed a 3rd paper to tie it all together. I searched my favorite digital paper source Summertime Designs and found the yellow and red flower design that matched my other papers perfectly in her Angel Mother kit! The best part is that her digi designs are free.

    Pictures of the tables and decorations  


    The jars fit perfectly in the center of a horseshoe


    One of the gals who helped with food made these sunflowers out of paper sacks from this inspiration


    We served brown sugar cinnamon flavored cream cheese mints & nuts, cheese and crackers, and fruit pizza with a cookie crust, brownie crust and gluten free.


    I made this from THIS pin. I used crackers for the center instead of grapes since we were having fruit on the dessert.


     Here is my gift to her. Three crocheted dish cloths and a bottle of dish soap. 


    Wednesday, May 13, 2015

    RI WIW DCC

    Today for Repeat Impressions Designer's Choice Challenge, I am the hostess, and my challenge was to create anything that wasn't a card.


    I created this pillow box using Cutting Cafe's Candy Corn Pillow Box Template and just erased the dashed lines at one end, so I could make it handled at the top. 

    I stamped Repeat Impressions' 9705-M Jar and 9609-E, Citrus Wedge in gray ink, then colored the lemons yellow and added glitter to the rinds.

    This would be a fun little gift to give filled with lemonade pkts and lemon candies. This is my last post for RI. Thank you Wendy for inviting me on the DT the past 4 months.

    Would you like to play along with us? Be sure to stop by The House That Stamps Built blog (Repeat Impression's blog) for more details on how you can play along, Each submission enters you in the drawing for a $25 Repeat Impressions Gift Certificate. You don’t always have to use their stamps in your creations, but you will receive an extra entry if you do. Also be sure to stop by each of the Rock Star's blogs and see what they did with this week's Challenge.

    Monday, May 11, 2015

    Design Team Call

    If you would like to be on THE BEST design team, here is some info for the Cutting Café design team call
    Design team badge
    Regina is looking to add a few new people to the Design Team for the term of: June through the End of September 2015.
     PLEASE NOTE: You do not need to have any prior experience with working with cutting files or printable (digital) stamps....but you do need to have a printer and a cutting machine or be able to hand cut templates. Plus you do need to have an active blog or online gallery and the ability to take clear photos of your projects.

    She is looking for the following:
    A few regular designers..(ie: creating any type of projects you want with monthly assigned Cutting Cafe Files). You will need to be able to do 2 post per month around the 7th and 21st of the month.
    A few Video designers....responsible for uploading at least 2 videos to YouTube a month using assigned Cutting Cafe files on or around the 7th and 21st of each month.
     To be considered, you will need to have an active blog or online gallery to upload your projects to and post to another online gallery of your choice...
     Compensation: While on the team, you will have access to all of the files that The Cutting Cafe sells as well as receive all new releases while on the team..

     If this sounds like something you would like to do, please email Regina at:
    fabriccutups@prodigy.net
     (put in the subject line design team call)
     In your email please tell her why you would like to join the team and a link to your online blog or gallery....
     Deadline: May 25th 2015

    The new team will be announced on the Cutting Café Blog by the end of May 2015.

     Please note: Regina tries to personally thank all that apply to be on the team, but unfortunately will not be able to contact each person that doesn't make the team. So be sure to check out the site by the end of May. 


    Saturday, May 9, 2015

    Misc Invites & Gifts

    WOW! 4 days in a row posts! I'm trying to get all caught up on all that I've been doing. Today, I have a few misc projects to share with you.

    Today is a baby shower for twins that I'm not hosting, but was asked to make the invitations for. I created these darling diaper invites as it is a diaper shower. Makes perfect sense for someone with twins!


    All of the diapers were a little different using papers from Echo Park's Bundle of Joy Boy Collection. The cute diaper and pin are from Cutting Cafe's Diaper Shaped Card & Invite Set Template. I only used the diaper and pin and glued the tabs of the diaper shut. Then on MSWord, I typed up the shower info and it slides in at the top of the diaper.

    Next up was an order for a little girl's first birthday party. The mother wanted it pink, camo, and a deer. Well, I couldn't find camo paper anywhere, not even fabric (except fleece), but did find this pink paper that had trees on it and you usually hunt where there are trees, so went with it.

    I think it turned out adorable and the mom liked them, so that's what mattered. The deer and white scalloped piece are from the Silhouette store Here and Here. The inside is the bubble enlarged in pink with the party info typed on it.

    My last project to share with you was another order from a cousin of mine that needed some wine tags for a bridal shower gift. She had seen some on Pinterest and wondered if I could make something like it. I e-mailed Regina with the Cutting Cafe to see if she had any wine tag files. She didn't and asked when I needed them and I told her the next day. People, she created THIS file that night and sent it to me the next day! WOW!! What a sweet lady! She even created the tags so you can add a pocket if you like to add a gift card or note.

    I don't drink so I had to scrounge around for something to show you how these work on the bottles. I had a bottle of Torani Brown Sugar flavoring that was the perfect size. I think these tags would be fun also for non-alcoholic drinks and even pop bottles.


    I found several poems on Pinterest to use for the occasions. Wouldn't these also be fun for a college student? Open a bottle for first final, first A, first essay, etc.