Tuesday, July 29, 2014

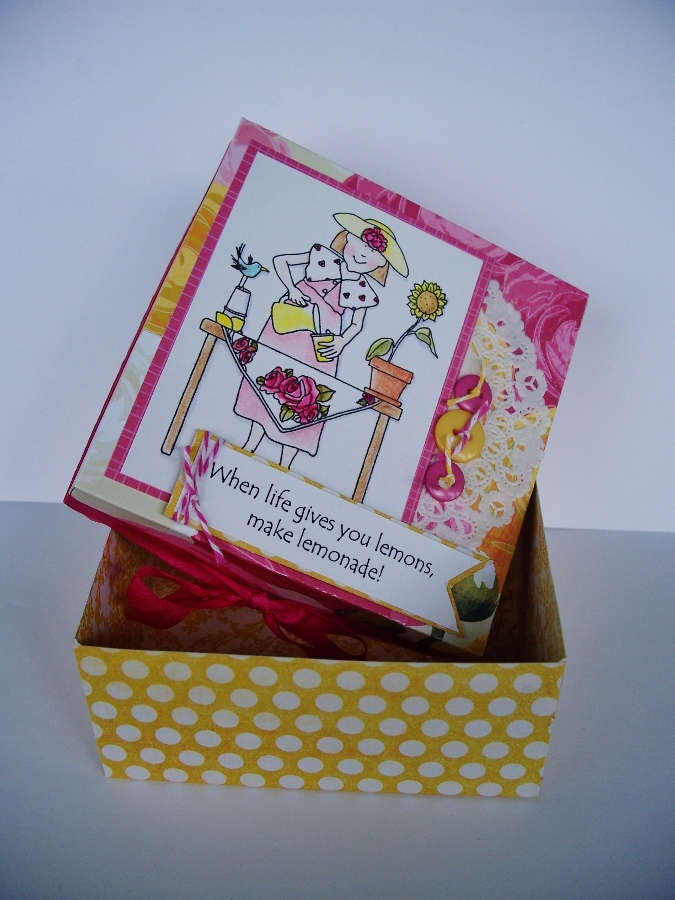
When Life Gives You Lemons

...Make Lemonade! Ü Here is a box that I created that would be fun to fill with Lemonade pkts. The stamped image is by Inky Antics and colored with Irojiten Colored Pencils and added some depth with Dual Brush Pens.

101_2823 (900x675)

I used Mono Adhesive Dots for the doily, Power Tabs for the buttons and for the rest of the box, Xtreme Adhesive.

101_2824 (675x900)


Monday, July 28, 2014

Pinned It Made It Monday Week 30

This is a purse I made with the Inky Antics stamped center piece from seeing THIS pin.


The free pattern can be found HERE on allfreesewing.

Friday, July 25, 2014

Just Flying By

**this is my 3rd post today! Ü be sure to scroll down to see my Pretty Paper Pretty Ribbon guest designer projects and my Frugal
Friday post.

Today the Tombow DT has guest designer Ellen from the Chilly Dog hopping with us. If you came from the Tombow Blog you are right on track.

For my project I have this fun card that is my favorite of the Benton Bears by Inky Antics.

I colored the image with Irojiten Colored Pencils and used Xtreme Adhesive for all the layers. Now it wouldn't be a hop without a prize:


Prize package will include:


In order to enter to win the prize, please comment on all the Design Team’s projects this week as well as “Like” TombowUSA and The Chilly Dog on Facebook! Now you are off to see what Melissa Cash has created for this hop.

Here is this week’s Line-up:
Tombow Blog
Debbie Fisher
Melissa Cash
Jennie Garcia
Marie Browning

Pretty Paper Pretty Ribbon Guest Post

Today, I am a guest designer for Pretty Paper Pretty Ribbon. I had so much fun created these two projects for them using their cutting files. Both are "purse" related. Ü These files are only 99¢ and you can use them over and over, so a great deal on some fun gift projects.

For my first project, I created this using their Purse Gift Card Holder file. I was able to get 2 out of one 12 x 12 sheet of designer paper, so just cut them both while I was at it. Tombow's Fastener Tabs were perfect for this project to hold down the little button flap (I cut one in half). Xtreme Adhesive was used to adhere the parts together. I love how this turned out and can't wait for an opportunity to treat someone.


My next project uses their K-Cup Treat Cutting File. This was easy to create using their instructions and I was able to get 2 out of a 12 x 12 sheet of designer paper as well.

I tried folding a piece of paper over the back and front like they showed, but it was just too tights, so I just added a decorative front with Nestibilities dies and used Fastener Tabs cut into small pieces to hold the handle shut. I used Xtreme Adhesive again for this project.


Thank you PPPR for having me as your guest designer this week. I had a ball creating these projects and now have 4 gift items ready to be used.

Be sure to stop by the PPPR blog as she has a Freebie Friday file every week.

Frugal Friday 7-25-14

*lemon lime soda 67¢/2 liter (we drink lots of limeades with all the fresh fruit in the summer)


*lemon lime soda five 12 pk/$9


*replaced zipper in jeans for son...not a fun job, but a sense of accomplishment being my first time doing it and saved them lots of money....zipper $4...new jeans $30...great savings!


*eating spinach and a very small onion from garden, lots of rhubarb (making desserts and syrup for limeades with it so far)


*took inventory of pantry, cupboards, freezer, etc and making as many meals as possible with what we have without buying lots of groceries every week


*enjoyed fresh fish from brother-in-law....yum!


*earned $30 in swagbucks, turned it in for Amazon bucks and bought birthday gift for son and me a new paper trimmer.


*rec'd shampoo/rinse, lotion, coffee samples in the mail


*rec'd lots of papercraft goodies for DT work with other companies


*free frozen custard with birthday coupon from Culvers


*free ice cream cone with birthday coupon from Baskin Robins


*great savings on goodies I needed for a "Sunshine in a Basket" that I wanted to make for a friend. 50¢ baskets and mugs at Goodwill.
*cereal 3 boxes for $5. My rule is no cereal unless it is $2 or under which means we don't buy a lot of cereal. Was so glad to find this bargain as DH likes to eat cereal for supper when he comes in late from the field (late as being after 9 pm)

Monday, July 21, 2014

Pinned It Made It Monday Week 29

**Looks like I had some blog issues, this didn't go live when I wanted it to...

This week I am sharing some pins of food I have made, but didn't get any pictures! I can't believe I forgot to take pics before it all got eaten. But it was all VERY good and I will be making them all again, so I will post pics next time.

I live in the country and the closest "town" is actually a village. It has a senior center where locals meet for coffee each day. I don't drink coffee, but I do go in from time to time. When it is your birthday, there is a birthday coffee for that person and they bring treats. My birthday was the 6th and I had my "coffee" the 8th. I made THESE yummy cheesecake bites. I have never made cheesecake before and I ended up making two!
Sally's Salted Caramel Chocolate Chip Cheesecakes
Photo courtesy of cupcakesgarden

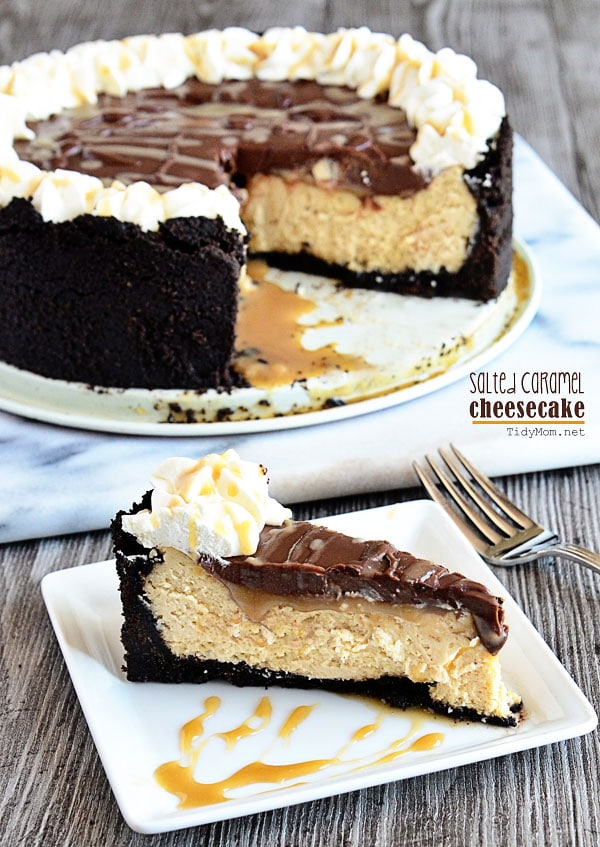
I also made THIS cheesecake recipe, but mine didn't look anything like this. I don't think I let the cheesecake set up long enough with the caramel and ganache, but it was DE. LIC.OUS! I made it just like it said, with the exception of the homemade whipped toppping.

Delicious Salted Caramel Cheesecake with Chocolate Ganache at TidyMom.net
Photo courtesy of tidymom

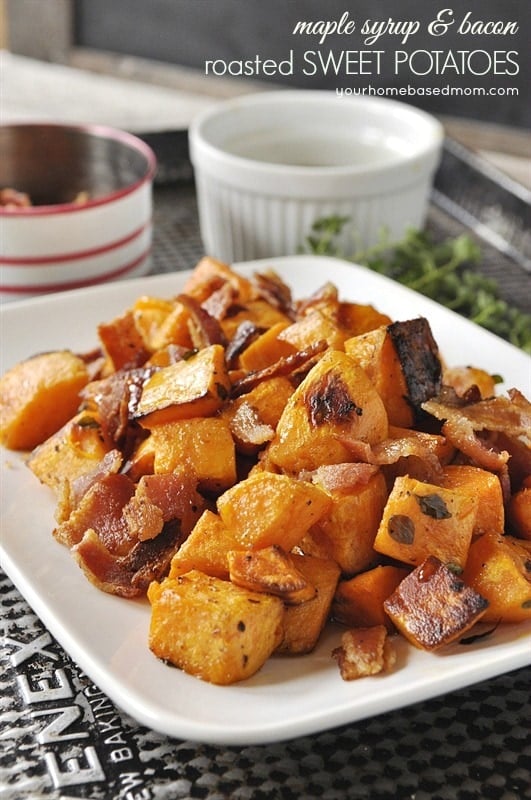
I also have tried THIS sweet potato recipe lately. Very yummy!

Maple Syrup Bacon Roasted Sweet Potatoes
Photo courtesy of yourhomebasedmom

Sunday, July 20, 2014

Fun with Paper Hats....Kinda

How is that for a title? LOL! This week is all about hats on Cutting Café. Hat files anyway. When Regina first sent out the Party Hat Template, I didn't see a hat, but a cone holder. I also used the new Rosette File.


For a chance to win 3 Cutting Cafe files of your choice, be sure to stop by the Cutting Cafe blog tomorrow and leave a comment AND to check out the files that the rest of the DT chose to create with this week. I'm guessing the others actually made hats. Ü


Wednesday, July 16, 2014

BFB The Pursuit of Tamsen Littlejohn

The Pursuit of Tamsen Littlejohn: A Novel - eBook  -     By: Lori Benton
The Pursuit of Tamsen Littlejohn was a good book, but the history put into it was a bit long and boring and at times I would not get what the point of the real history and the made up story had in common.


If all of that very long detail had been left out, it would have been a 5 star book for me. In The Pursuit of Tamsen Littlejohn Tamsen Littlejohn escapes her wicked stepfather and marriage proposal of a would be suitor. She seeks refuge with a stranger who whisks her away to the Watauga settlement in western North Carolina. However, life becomes even more complicated. The story is filled with lots of intriguing moments and revelations as the two get to know each other and find the truth about their pasts.


I received this e-book free from Water Brook Multnomah Publishing Group for this review.

Monday, July 14, 2014

Pinned It Made It Monday Week 28/Sunshine Basket

This is a BIG post, so sit back and relax with a cup of tea or whatever. Ü Today's post is in conjunction with this week's Tombow post. To see that post, just scroll down. This whole post is inspired by the Basket/Box of Sunshine ideas that are on Pinterest.

I made a Basket of Sunshine for a friend who was going through cancer over a year ago and forgot to take pictures of it. It was so much fun to create. I have been wanting to make another (or 2 or 3) for some loved ones going through tough times right now and decided this was a good time to get it done.

Ever since the first basket I made for my friend Teri, I have been keeping an eye out for "yellow" sunshine-y items I could add to a box/basket. Whenever I'm going to be out of town, I make sure to print a Hobby Lobby coupon so I can pick something up, if I come across it.

Here is the basket that I created. Last week, my DIL and I took a girl's day and went to Kearney shopping. We had some things we needed to do there, so I kept my eye out for yellow. Ü We went to Goodwill and I found some mugs that had a yellow band around them. Perfect! My purpose was to go there and get a basket or two and found them for 50¢ each, so ended up getting 3. The mugs were 50¢ as well, so that was a fun find.

I added some Lemon Zinger tea in the mug. I like this tea hot and cold. To go with the tea, I made some Lemon Biscotti that I drizzled with yellow melting discs (that I used my Hobby Lobby coupon on Ü). Yummy!

I already had a yellow dishcloth crocheted up, so added that to my basket. I like to add personal items that I have made. The flowers were some I had gotten at a store last year marked down for 76¢. I wish they would have had more of them. I think it is a perfect accent to this basket. Put them in a vase and it's sure to brighten one's day. Oh and the yellow towel I lined the basket with, is one I've had in my stash for a very long time. I have about 3 more of them, just waiting for a project like this to brighten one's day.

I then added a pkg of microwave buttery popcorn, Caramel Milky Way Bar, Peanut M & M's, Lemon Drops and Lemon flavored gum for fun. With all the school items out now, I found some yellow sticky note pads and grabbed a couple of them for my baskets. A pretty pen, I already had in my stash for when I had been yellow hunting in the past, Pina Fanta (not sure how it tastes, but it was yellow and looked like fun) and this cute tea lite that I found in the dollar section at Target. I added some yellow tape that I had in my stash around the base edge. This is really fun lit up. So much fun, I had to tell my son to quit playing with it. LOL!


For another homemade treat, I made some Lemon Puppy Chow! Oh my....this is yummy! I put it in a Starbuck's coffee jar that I decorated...in yellow of course.


I have a Biscotti Board and Lemon Board if you want to take a look at them for ideas to fill your own Sunshine Basket/Box. Be sure to scroll down to the post before this one on more details on my sun shaped card.

Have you made a Sunshine Box/Basket? I would love to hear about it and what you filled it with.


Lemon Puppy Chow
via youandmearewe blog

9 cups rice squares cereal (Chex, or your store's brand)

1 1/4 cup white vanilla chips (not white chocolate chips!) **I used white melting discs that I had gotten from Hobby Lobby with my 40% off coupon
1/4 cup butter1 fresh lemon
1 3/4 cup powdered sugar


Measure your cereal into a large bowl. In a separate (microwave safe) bowl, mix together your white vanilla chips, butter, and the juice of one fresh lemon. Microwave that puppy on high for a minute and a half - stirring occasionally. Just a tip, it's going to get foamy, so make sure you keep an eye on it so it doesn't get all over the microwave. Once the mixture is nice and creamy (you may need extra time depending on your microwave), fold it into the cereal. Make sure it's all coated nicely, then add the powdered sugar and toss well.
**I am a chocolate fan, but these were very nice and tasty and I will definitely by making them again.

Lemon Biscotti

via livlife

2 3/4 cups all-purpose flour 

1 cup sugar 
2 teaspoons baking powder 
1 1/2 tablespoon grated lemon rind 
2 tablespoons or lemon juice **I used 3 tablespoons
1 tablespoon vegetable oil 
3 large eggs 
Cooking spray 

Lightly spoon flour into dry measuring cups; level with a knife. Combine flour, sugar, and baking powder in a large bowl. Combine rind, lemon juice, and add to flour mixture, stirring until well-blended (dough will be dry and crumbly). Turn dough out onto a lightly floured surface; knead lightly 7 to 8 times. 

Preheat oven to 350°. Divide dough in half. Shape each portion into an 8-inch-long roll. Place rolls 6 inches apart on a baking sheet coated with cooking spray; flatten each roll to 1-inch thickness. Bake at 350° for 30 minutes (*I prefer to bake for 20) 

Remove the rolls from baking sheet; cool for 10 minutes on a wire rack. (**I prefer to cut mine hot and not wait 10 minutes)   

Cut each roll diagonally into 15 (1/2-inch) slices. Place the slices, cut sides down, on baking sheet. Reduce oven temperature to 325°; bake for 10 minutes. Turn cookies over; bake an additional 10 minutes (the cookies will be slightly soft in center but will harden as they cool). Remove from baking sheet, and cool completely on wire rack. ***After they cooled, I drizzled them with the melted yellow baking discs.

Sunshine Challenge

It's challenge week on Tombow and I am your hostess. My challenge is to use the color yellow and sunshine. The inspiration for this challenge is the Box/Basket of Sunshine ideas I've seen on Pinterest. I even have a Box of Sunshine board if you would like to visit it for more ideas.

I created this card for my basket of goodies that is going to a friend who is going through a tough time. I wanted something to cheer her up and I hope this does it. If you would like to see my basket of goodies that I made to give her, go here. There are recipes and other ideas for you.

I used the Sun Shaped Card and Every Day Mini Words files from Cutting Cafe. The patterned papers are adhered to the card with MONO Adhesive Dots and the layers are put together using Xtreme Adhesive. To adhere the bow, I used a Power Tab.


If you would like a chance to win the Tombow products that I used on this card, be sure to stop by the Tombow blog for details on how to play and win.


Friday, July 11, 2014

Frugal Friday 7-11-14

*rec'd free shampoo, rinse, and lotion samples
*rec'd 2 free silicone baking mats after a long messed up order...they ended up sending them to me for free
*watched 2 movies for free (if you live in the area, free movies at the old Methodist Church in Comstock, Fri and Sat nites at 7:30 pm)
*ate lots of leftovers
*spinach from our garden...YAY! first fruits of our labor this summer
*watched free movie on HULU
*bought 2 liter generic lemon lime soda for 84¢ each for homemade limeades
*

Tuesday, July 8, 2014

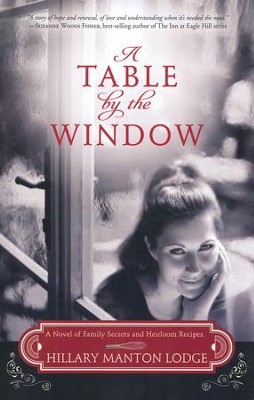
BFB A Table by the Window

A Table by the Window, Family Secrets & Heirloom Recipes Series #1   -     By: Hillary Manton Lodge


A Table by the Window by Hillary Manton Lodge was a fun read. It is filled with many recipes as the story of food writer Juliette is told. The story opens up with Juliette  receiving a special table her grandmother willed to her. Juliette is the youngest in her family who are all involved in food from owning food business, chefs, etc.


After a relationship gone bad, Juliette tries on line dating. She "meets" someone after she thought she had deleted her account to the online dating service.


This story was so well written, it was hard to put down. The ending is such a surprise because it is like it stopped mid sentence. Now I need to find the second book to the series. Ü


I highly recommend this book and received this e-book free from Water Brook Multnomah Publishing Group for this review.

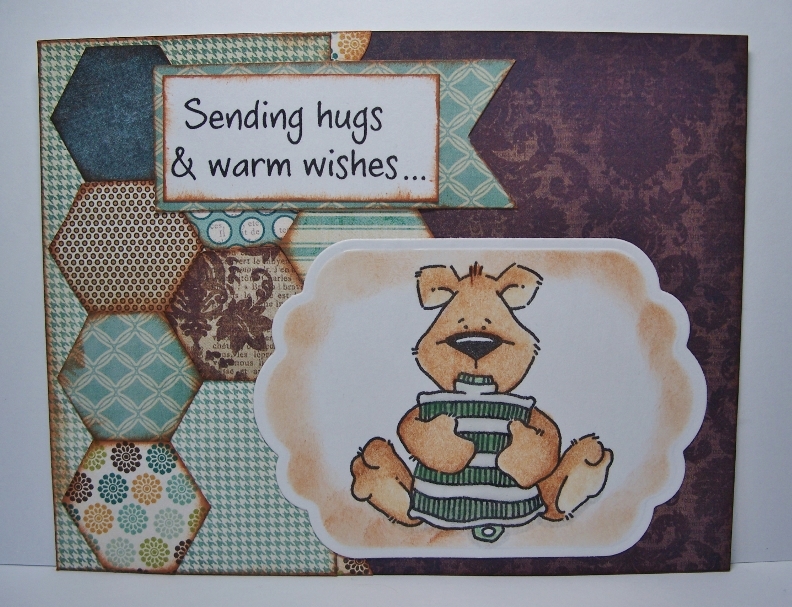
Sending Hugs

I have a cute card to share with you today using an Inky Antics image and colored with Irojiten Colored Pencils (which by the way are on sale for 99¢ each! a $2 savings). The hexagon shapes is  a cutting file from Cutting Cafe and was adhered to the card with Mono Adhesive Dots.

Sending Hugs

Monday, July 7, 2014

Pinned It Made It Monday Week 27

This week's Pinned It Made It is actually made by my youngest son. Yesterday was my 50th birthday and he decided I needed a cake for my birthday. This is the first cake he has ever made and it was so moist and yummy! Here is the pin to the recipe he used. He didn't make the frosting from the recipe, but I bet it would be good too.

This is what a cake with 50 candles looks like. It's a wonder all the fire alarms didn't go off. LOL


Then the kids had to be funny and add candles that don't go out. But it was cool cuz they put them in the mass of candles to form a happy face. Do you see it?

Here is Aaron trying to scrape all the wax off the frosting. Ü


Beatty's Chocolate Cake

Ingredients
  • Butter, for greasing the pans
  • 1 3/4 cups all-purpose flour, plus more for pans
  • 2 cups sugar
  • 3/4 cups good cocoa powder
  • 2 teaspoons baking soda
  • 1 teaspoon baking powder
  • 1 teaspoon kosher salt
  • 1 cup buttermilk, shaken
  • 1/2 cup vegetable oil
  • 2 extra-large eggs, at room temperature
  • 1 teaspoon pure vanilla extract
  • 1 cup freshly brewed hot coffee
  • Chocolate Buttercream, recipe follows
  • Chocolate Frosting:
  • 6 ounces good semisweet chocolate (recommended: Callebaut)
  • 1/2 pound (2 sticks) unsalted butter, at room temperature
  • 1 extra-large egg yolk, at room temperature
  • 1 teaspoon pure vanilla extract
  • 1 1/4 cups sifted confectioners' sugar
  • 1 tablespoon instant coffee powder
Directions
Preheat the oven to 350 degrees F. Butter two 8-inch x 2-inch round cake pans. Line with parchment paper, then butter and flour the pans.
Sift the flour, sugar, cocoa, baking soda, baking powder, and salt into the bowl of an electric mixer fitted with a paddle attachment and mix on low speed until combined. In another bowl, combine the buttermilk, oil, eggs, and vanilla. With the mixer on low speed, slowly add the wet ingredients to the dry. With mixer still on low, add the coffee and stir just to combine, scraping the bottom of the bowl with a rubber spatula. Pour the batter into the prepared pans and bake for 35 to 40 minutes, until a cake tester comes out clean. Cool in the pans for 30 minutes, then turn them out onto a cooling rack and cool completely.
Place 1 layer, flat side up, on a flat plate or cake pedestal. With a knife or offset spatula, spread the top with frosting. Place the second layer on top, rounded side up, and spread the frosting evenly on the top and sides of the cake.

Chocolate Frosting: Chop the chocolate and place it in a heat-proof bowl set over a pan of simmering water. Stir until just melted and set aside until cooled to room temperature.
In the bowl of an electric mixer fitted with a paddle attachment, beat the butter on medium-high speed until light yellow and fluffy, about 3 minutes. Add the egg yolk and vanilla and continue beating for 3 minutes. Turn the mixer to low, gradually add the confectioners' sugar, then beat at medium speed, scraping down the bowl as necessary, until smooth and creamy. Dissolve the coffee powder in 2 teaspoons of the hottest tap water. On low speed, add the chocolate and coffee to the butter mixture and mix until blended. Don't whip! Spread immediately on the cooled cake.

Saturday, July 5, 2014

B is for...

Birthday! This week on Cutting Cafe the DT is using A-Z Letter Set. July is my birthday "month", but this card is actually for someone else. I love how simple and easy this was, but still super cute. I needed a quick project this week as I made 163 Kolaches and 108 cinnamon rolls for the senior center to sell as a fundraiser during yesterday during the 4th celebration Comstock holds each year. And then to also get ready for the annual BBQ we put on here at home! I think I must be crazy LOL! Guess that's what happens when you're about to turn 50...you lose your mind. Ü

 I also used Birthday Greetings Inside and Out printable file and Mono Adhesive Dots for my adhesive..
For a chance to win 3 Cutting Cafe files of your choice, be sure to stop by the blog on the 7th and leave a comment AND to check out the files that the rest of the DT chose to create with this week.

Tuesday, July 1, 2014

May Arts Final Project

This is my final project for the May Arts Design Team application.


I used several May Arts ribbon to create this Patriotic Wreath and I will share with you how I created it. I had seen on Pinterest how you can buy a pool noodle to make a wreath instead of spending lots of money on styrofoam wreaths and knew I wanted to give it a try.

I started by duck taping the ends together and then using 1.5" Denim Ribbon to wrap all around the foam wreath. I added Xtreme adhesive to the ribbon about every 5 wraps just to hold it into place.

Here is how I created 3 different ribbon flower to add to the wreath. For the bottom flower, I cut a  flower off of  the 2.5" White Sheer/Frayed/Flower Ribbon, then cut in half, then glued the 1/2 piece in half and glued to a cut cardstock circle. 

 I glued 8 to the circle piece and then hand gathered some 5/8" Denim Ribbon in glue on top of that and added 4 more white flower 1/4 pieces to the top of that. It seemed like it needed something more, so I wrapped some Mini Pom Pom Trim in red around my fingers a few times and pressed it into some glue in the center of the flower.


To make the center flower I ran a running stitch along one edge of 2" Solid Ribbon w/ Diagonal Stripes and gatthered until it made a nice circle and glued onto a cardstock circle.


Then I cut some  white flowers like the first one I showed you and added a layer on top of the stripes. To finish it off, I made a rolled flower out of  1.5" Red Crinkle Ribbon.

To create the center, tie a knot in one end of the ribbon (here I am using the stripe ribbon, but decided it was too much stripe, so made a solid red one and forgot to take pics as I went along making it.).

Trim the excess close to the knot and press into adhesive on cut cardstock circle. Then twist and roll ribbon around the knot and press into glue as you go until you have covered the cardstock circle. To finish off, I just glued the tail to the back of the circle.


The last flower was made the same way as the center of the flower above. By using a bulkier fabric...I used 2" Burlap/Cotton Blend Ribbon...it gives a completely different look.

I glued these to the wreath and added a flag I've had around for a long time.

For the banner, I cut 3 pieces from some Natural 4" Burlap Wired Ribbon and cut "v's" out of one end and folded the other end over enough for some Ivory Paper Cord Ribbon to fit and glued down over the cord. I then painted each banner red and cut some letters from Cutting Cafe's  USA Word Shaped Card Template and Cutting File Set out of fabric that had been fused to Wonder Under and then fused the letters to the center of the banner.

To finish it off, I tied the Paper Cord Ribbon to the wreath and added some tied bows between the letters using 5/8" Denim, Grosgrain Dots, and Woven Chevron Stripes Ribbons.

Because the pool noodle is light, I was able to just add a pop can tab to the back to hang it up.


I hope you all enjoyed this tutorial and project. Thank you May Arts for the ribbon and a chance to be on your DT.