This week we have a fun challenge on Cutting Cafe. Regina challenged us all to make a notepad using any file from the Shaped Cards section. The hardest part of this challenge was which file to pick! I had so many ideas from looking through the shaped cards section. The idea was to basically make a front and back of your chosen design and then to cut several sheets of paper or cardstock for the filler.
Well, you know me...always thinking outside of the box. LOL
I decided to use the Ribbon Spool Set for my notepad cover.

Here is how I created it...
I resized the spool to fit to the size of my notepads from the Dollar Tree. The length is 5.25" and the inside spool width is 4". I cut 4 of the base pieces, 2 patterned paper to layer the front and the back (I didn't layer the inside as the notepad will be covering it up), 2 pieces for the middle of the spool and then I cut 2 base pieces for the pockets and cut them down to 3" tall, and 2 layering pieces to fit the inside pocket pieces. I also cut a piece of cardstock 2.5" x 3.25" for the spine. Along the 2.5" side I scored it at 1" and 1.5".

I layered the patterned paper to the front and back and inside "pocket" pieces. To the front only, I added rick rack (and now I think I'm going to go back and add it to the back) and then typed and printed "sew I don't forget" and adhered that to the front as well.

To the second set of spool bases, I adhered adhesive to the bottom and sides only to create my pocket.

To the spine I adhered double side adhesive to both sides of the 1" ends.


I removed paper from the inside of the spine piece and adhered to the inside pieces.

here is what it looks like when you flip the inside over:

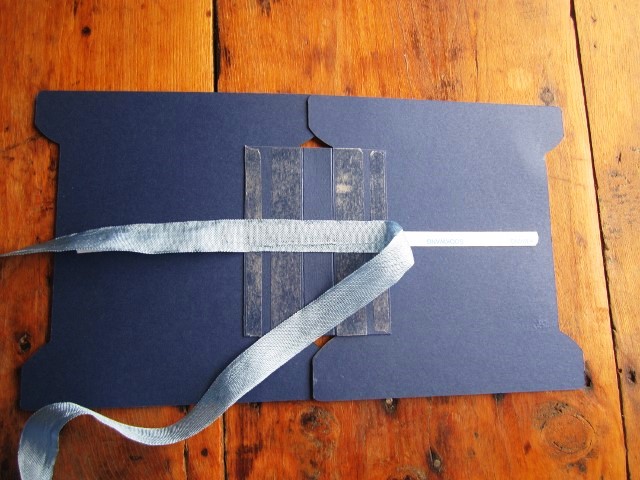
I removed the paper and centered a 24" piece of ribbon:

I forgot to take a picture of the next step: Adhere the front and back decorated spool pieces over the ribbon.
Next, trim off about .5" from the back of 2 paper pads. This keeps the end from sticking to the adhesive on the bottom of the pocket, plus makes the pad fit in better. I learned this trick from my YouTube friend Amber. I got the idea to make this notepad holder from her tutorial HERE.

Now insert the note pads in each pocket

Tie the ribbon ties and you have a cute notepad holder.
Well, you know me...always thinking outside of the box. LOL
I decided to use the Ribbon Spool Set for my notepad cover.
Here is how I created it...
I resized the spool to fit to the size of my notepads from the Dollar Tree. The length is 5.25" and the inside spool width is 4". I cut 4 of the base pieces, 2 patterned paper to layer the front and the back (I didn't layer the inside as the notepad will be covering it up), 2 pieces for the middle of the spool and then I cut 2 base pieces for the pockets and cut them down to 3" tall, and 2 layering pieces to fit the inside pocket pieces. I also cut a piece of cardstock 2.5" x 3.25" for the spine. Along the 2.5" side I scored it at 1" and 1.5".

I layered the patterned paper to the front and back and inside "pocket" pieces. To the front only, I added rick rack (and now I think I'm going to go back and add it to the back) and then typed and printed "sew I don't forget" and adhered that to the front as well.

To the second set of spool bases, I adhered adhesive to the bottom and sides only to create my pocket.

To the spine I adhered double side adhesive to both sides of the 1" ends.


I removed paper from the inside of the spine piece and adhered to the inside pieces.

here is what it looks like when you flip the inside over:

I removed the paper and centered a 24" piece of ribbon:
I forgot to take a picture of the next step: Adhere the front and back decorated spool pieces over the ribbon.
Next, trim off about .5" from the back of 2 paper pads. This keeps the end from sticking to the adhesive on the bottom of the pocket, plus makes the pad fit in better. I learned this trick from my YouTube friend Amber. I got the idea to make this notepad holder from her tutorial HERE.

Now insert the note pads in each pocket

Tie the ribbon ties and you have a cute notepad holder.

Note: there is space in the middle to add a pen, but I didn't have one that matched. I will buy one and add to it later.
Thank you for stopping by and be sure to visit the Cutting Cafe Blog tomorrow to see the design team's projects in which you can leave a comment to be entered into a drawing to win 3 FREE sets of your choice from the online store.
I AM IN AWE WITH THIS PROJECT....wow my friend so awesome....
ReplyDeleteVery very cool! And beautiful! LOVE THIS and just might try it myself!
ReplyDeleteA Great tutorial and note pad - Bravo!
ReplyDeleteJust beautiful!
ReplyDeleteLove your "sew" cute note pad. Thanks for the awesome details of instruction as well.
ReplyDeleteIt's a great idea Debbie. Thanks for the tutorial.
ReplyDeleteHugs