This week is all about fall for the Cutting Café Design Team. We were given 3 files to choose from:
Acorn Shaped Card, Fall Shaped Card, and Welcome Fall
I chose Acorn Shaped Card and added Halloween and Fall Basic Shapes (leaf) and
When I Count My Blessings (autumn blessings) to create my project.
I enlarged the acorn a little and stretched it lengthwise a bit as well and cut 2 from burlap (which I had ironed on a lightweight interfacing to the back to help stabilize it) being sure to flip one image so they can be sewed together. Then I ironed fusible webbing to the brown fabric and cut and ironed to the acorn shape. (note: next time I will use a LIGHTWEIGHT webbing, what I used was way to stiff)
I printed "autumn blessings" on paper and pinned to my acorn and then just stitched right on the paper. The stitching "pierces" the paper making it easy to (carefully) tear from the stitching when done.
The stem is cut from felt and then I sewed the two acorn pieces together, leaving an opening to stuff with fiberfill and then sew closed. (2nd note: do NOT leave opening where burlap is, frayed WAY too much!)
I fused 2 pieces of flannel together and cut the leaf. The line down the leaf was embroidered. I attached it and the bow to the acorn with Tombow's Power Tabs.
I hope this project gives you more ideas of how you can use the cut/printable files. Be sure to stop by the Cutting Café blog Thursday morning to see all the other lovely fall projects the design team created.
Tuesday, September 24, 2013
Monday, September 23, 2013
Tombow Blog Hop for a Cause with Ema Perez
We normally have our monthly challenge the last week of the month, but we will continue that next month as we participate in a special hop this week with Ema Perez. Ema is involved in a mission to create 300 cards for children at St. Jude's Children Research Hospital.
Here is a little background on why Ema got involved in this mission:
"I became involved with St. Jude's Children Research Hospital first just donating money. Then one day I received a phone call the my little nephew at age 2 had cancer and was taken to St. Jude's Children Hospital." According to Ema, "That's where it all began. I started to donate money and then it hit me that there is something I do to bring a smile to each child's face. That's when I started to create cards for them just to put a smile on their faces and means the whole to me!"
For this week's hop we are asking people to get the word out about Ema's Project to create 300 cards for St. Jude Children's Hospital. You can leave your e-mail in a comment if you would be interested in creating cards to send to Ema that will help her reach her goal!
Here is the card that I created to send to Ema. I also went through my card stash and was able to find some other cards that would be perfect and will be sending those as well. This image is from Inky Antics. I colored it with Irojiten Color Dictionary Pencils. The adhesive I used to adhered the image to the front of the card is Stamp Runner Dot Adhesive.
Tombow will be giving out 2 sets of the prize shown below.
Now it's time to hop over to Melissa's blog. Have fun hopping and I hope you all have time to create a card for a child.
Here is this week’s Line-up:
Tombow Blog
Debbie
Melissa
Jennie
Marie
Ema Perez
Tombow Blog
Here is this week’s Line-up:
Tombow Blog
Debbie
Melissa
Jennie
Marie
Ema Perez
Tombow Blog
Pinned It Made It Monday
I have another yummy Pinterest recipe to share with you today. This is called Chicken Bacon Ranch Pizza Casserole.
Since I still did not have an oven, I made this in a bread loaf pan so that it would fit in the toaster oven. The extra, I put in a smaller pan and sent home with my future DIL.
source: Just a Pinch
I have made this twice now. The first time I made it like it said and used chicken thighs. The second time I used shredded chicken breast and like that even better.
I am linking this up to Country Girl at Home for her Pinned It Made It Monday challenge.
Saturday, September 21, 2013
BFB Forever Friday
"Forever Friday" is a beautifully written love story about a couple who found their soulmate. Adam Colby is a going through items from an estate sale for his business, when he finds an album full of postcards with a love poem that Gabe Alexander wrote to his wife Pearl every Friday for sixty years. Adam has gone through a divorce and is curious about their story.
I wasn't sure if this was a book that I was going to really like or not, but I loved it and had a hard time putting it down! I highly recommend this book!
Here are some fun links regarding the story:
I received this book for free from WaterBrook Multnomah Publishing Group for this review.
Monday, September 16, 2013
Tombow hops with Stacy Julian
This week we are hopping with guest designer Stacy Julian. She has her own company called Big Picture Classes where she teaches.
I got the idea for my project here. I am guessing from the sizes she says to cut the paper, she used a mini candy bar. I used a regular sized Hershey's Almond Bar, so you will have to adjust the measurements to fit the size of candy you want to cover. I also did not add the second white circle to the eyes.
Wouldn't it be fun to add a tag that says "I want my mummy"? Ü
I used scraps, which this project is perfect for and adhered them with Mono Adhesive Permanent.
Along with the hop we have another fun prize that is being given away. All you have to do to enter is “Like” BOTH TombowUSA and Stacy Julian on Facebook. Then comment that you did and what you liked about the post.I got the idea for my project here. I am guessing from the sizes she says to cut the paper, she used a mini candy bar. I used a regular sized Hershey's Almond Bar, so you will have to adjust the measurements to fit the size of candy you want to cover. I also did not add the second white circle to the eyes.
Wouldn't it be fun to add a tag that says "I want my mummy"? Ü
I used scraps, which this project is perfect for and adhered them with Mono Adhesive Permanent.
Tombow will announce the WINNER on FRIDAY September 20th at 3:30 EST on FB.
.
Melissa:
Jennie:
Marie:
Monday, September 9, 2013
Tombow Blog Hop with Tifany DeGough
Welcome to Tombow's Blog Hop with Tifany DeGough! Today I am sharing a mini album in an Altoid box. This is the box decorated. "My photos" was created on the computer and then printed onto colored cardstock. The "P" was created on the computer, printed on the backside of patterned paper and then cut out. The papers were adhered to the tin with Mono Adhesive Dots Stamp Runner and Mono Glue Stick.
I cut patterened paper to fit inside the tin and accordian folded it. Here is one side.
Here is the backside. Now it is ready to just add photos.
Would you like a chance to win some Tombow goodies? Be sure to comment on each of the blogs for a chance to win the following:
Next up on the hop is the super talented Melissa Cash!
Melissa:
Jennie:
Marie:
Tombow Blog:
http://blog.tombowusa.com/
Sunday, September 8, 2013
Cutting Cafe Apple Keychain
Hello! This week the Cutting Cafe DT is creating projects using one of the following 3 files:
Apple Treat Box
Bus Shaped Card
School Borders
I chose to go "out of the box" using the Apple Treat Box file. I had seen this post and knew I wanted to create a key ring using Regina's file.
I ironed the fabric onto Heat & Bond and then cut out 2 apples (with one file flipped horizontally) with my Silhouette, it cuts the fabric like butter...♥ it! I ironed one apple to cotton batting and then trimmed. Then I sewed the two apples with cotton batting and brown grosgrain ribbon between them. I cut 2 leaves from felt and sewed it to the apple.
I shrunk the apple pattern down to 2" wide. This would make a great gift for a teacher.
Apple Treat Box
Bus Shaped Card
School Borders
I chose to go "out of the box" using the Apple Treat Box file. I had seen this post and knew I wanted to create a key ring using Regina's file.
I ironed the fabric onto Heat & Bond and then cut out 2 apples (with one file flipped horizontally) with my Silhouette, it cuts the fabric like butter...♥ it! I ironed one apple to cotton batting and then trimmed. Then I sewed the two apples with cotton batting and brown grosgrain ribbon between them. I cut 2 leaves from felt and sewed it to the apple.
I shrunk the apple pattern down to 2" wide. This would make a great gift for a teacher.
Be sure to stop by the Cutting Café Blog Thursday morning to see the fun projects the rest of the DT created with our Back to School theme.
Wednesday, September 4, 2013
Mini Note Set
This week the new Cutting Café DT is sharing projects of their choice. I chose 2 sets: Mini Note Pad and Card Set and Apple Treat Box. I used the lined note card and in WORD added "from the desk of...". Using the Apple Treat Box file, I shrunk the apple down to 1" and cut 12 of them for my note cards.
Tombow's Mono Adhesive Dots is the perfect adhesive for adhering tiny pieces. Just run the adhesive on the tiny piece that is laying on some scrap paper and then lift up. You can rub the little adhesive dots away that stick to the edges.
I had fun creating these and think they turned out pretty cute. Hope the recipient likes them too. Ü
Tombow's Mono Adhesive Dots is the perfect adhesive for adhering tiny pieces. Just run the adhesive on the tiny piece that is laying on some scrap paper and then lift up. You can rub the little adhesive dots away that stick to the edges.
I had fun creating these and think they turned out pretty cute. Hope the recipient likes them too. Ü
Monday, September 2, 2013
Tombow Hops with Fancy Pants
I am so excited to share that we at Tombow are hopping with Fancy Pants this week. They were SOOO generous in sending us goodies and I had a hard time deciding what to use to show you for this hop. I ♥ Fancy Pants!
If you came from the Tombow blog you are on the right track. I have 3 super fun pillow pumpkins to share with you.
Pink Stamp Runner (https://tombowusa.com/craft/detail/62162)
Monday:

If you came from the Tombow blog you are on the right track. I have 3 super fun pillow pumpkins to share with you.
I saw this idea on Pinterest and knew I had to make some of these. I used the pattern from Silhouette. I dressed mine up quite a bit and used tree branches (we have a ton of them since the tornado!!) that I cut for the stem. I cut felt leaves using this pattern from Miss Kate Cuttables. I will fill them with fall candy and give to friends.
I will break these down and let you know what I used on each one. This pumpkin uses the wood grain paper from Collecting Moments called Hallmark. The green strip is a sticker strip from the Collecting Moments line as well. The little banners and sticker letters are from the Happy Go Lucky line.
The solid paper for this pumpkin is "Strips" from Collecting Moments...(the other side has strips). I used a stripe sticker from Happy Go Lucky and the "Good Times" sticker was adhered to a green polka dot strip from Happy Go Lucky as well.
This last pumpkin uses a polka dot paper (that I need a BUNCH of! ♥ it!!!) is "Golden Road" from Collecting Moments line. The ticket was cut from "Playful" in their Happy Go Lucky collection. It is a patterned paper with tickets all over it.
I sewed sequins to thin paper making French knots and then tore the paper away and adhered them with Mono Multi Liquid Glue. Mono Multi was also used to adhere everything else except for the doilies, and for that I used Mono Adhesive Dots.
here is a close up of the sequins
I spritzed all 3 pumpkins with Dual Brush Pen 977 Saddle Brown using an air art gun. It helped tone down the white doily and gave it a fun look.
Leave a comment each day on the blogs playing along for a chance to win some fun prizes and "like" both companies on their FB pages (Tombow & Fancy Pants) and then comment that you did and what you liked about the post. Giveaway is only open to US/Canadian residents.
Tombow:
Power Tabs (https://tombowusa.com/craft/detail/52135)
Foam Tabs (https://tombowusa.com/craft/detail/52129)Pink Stamp Runner (https://tombowusa.com/craft/detail/62162)
Fancy Pants:
Now it's time to head over to the Fancy Pants' blog.
The schedule for the week will be:
Monday:
o Nicole & Amy
Tuesday:
o Diana & Mindy
Wednesday:
o Pamela & Jess
Thursday:
o Angie & Greta
Friday:
We will announce the winners of the blog hop prizes at 3:30 Eastern Time via Facebook and the blog!
Because I got this idea from Pinterest, I am linking this up to Country Girl at Home for her Pinned It Made It Monday challenge.
I am also entering this in Silhouette Blog challenge.
Tuesday, August 27, 2013
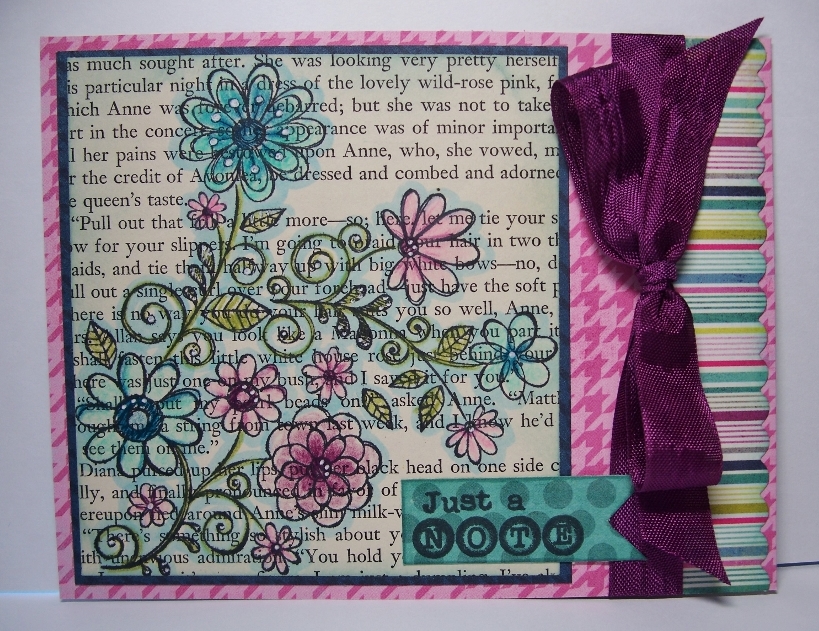
Just a Note
Happy Tuesday! Today, I have a fun card to share with you. I stamped the floral image onto a page out of an old Anne of Green Gables book. I have my own Anne of Green Gables book, but this was an old one that was found in a pile the library was giving away.
Tomorrow, Marie is going to be our hostess for our monthly challenge. This card fits her challenge. Can you guess what it is? Be sure to stop by the Tombow blog tomorrow and play along with us.
I colored the image with Irojiten Color Dictionary Pencilsand then went around the whole image with Dual Brush Pen 491-Glacier Blue. I added a few white dots with a gel pen. I like using Tombow's Mono Glue Stick when adhering newsprint or papers that stronger adhesive sometimes tears. It is also easier to add glue to the whole panel so that it doesn't buckle up. I used Mono Adhesive Permanent to adhere the rest of the layers.
Monday, August 26, 2013
Pinned It Made It Monday
This pin is courtesy of my 21 year old son. He sent me a link to a birthday cake he wanted me to make for him... Chocolate Turtle Cake. He refuses to go to Pinterest, but I pinned the link he sent me, so now it IS on Pinterest. Ü The recipe calls for a cake mix, but he wondered if it would be "too hard" to make a German chocolate cake from scratch. So I headed to Pinterest and found THIS one.
We had to celebrate his birthday a week early on the 16th (his bd is the 23rd) as he was headed back to college the next day. Hard to believe he is going to be a senior! But he is far from being done with school, since med school will be next. I sent all that was left over with him.
Just a personal note: As of Friday we are now empty nesters...we do NOT like it! I cried on the way home, most of Saturday (sobbing really as I was walking, the people I met probably thought I was loony). It is not fun. I KNOW that this is what we raised them for, it is not natural to not leave home, but 21 years of our lives has been wrapped around our boys. We love having our kids close. We are so very proud of the young men they have become and love them very much. We are just very lonely right now.
On a happier note...Benjamin is engaged! We could not be happier. Kassy is a sweetheart and we are so excited and blessed to have her join our family. She asked if I would help with some of their wedding plans, so I will be busy doing that...which is a VERY good thing!
One more note...I did not go back to school. Lots of factors played into that decision. It was very hard, but after making it, a huge weight was lifted from my shoulders, so I know I did the right thing. Where do I go from here? Not sure. Right now I am delivering meals on wheels part time and we will see where God leads next.
I am linking this up to Country Girl at Home for her Pinned It Made It Monday challenge.

We had to celebrate his birthday a week early on the 16th (his bd is the 23rd) as he was headed back to college the next day. Hard to believe he is going to be a senior! But he is far from being done with school, since med school will be next. I sent all that was left over with him.
Just a personal note: As of Friday we are now empty nesters...we do NOT like it! I cried on the way home, most of Saturday (sobbing really as I was walking, the people I met probably thought I was loony). It is not fun. I KNOW that this is what we raised them for, it is not natural to not leave home, but 21 years of our lives has been wrapped around our boys. We love having our kids close. We are so very proud of the young men they have become and love them very much. We are just very lonely right now.
On a happier note...Benjamin is engaged! We could not be happier. Kassy is a sweetheart and we are so excited and blessed to have her join our family. She asked if I would help with some of their wedding plans, so I will be busy doing that...which is a VERY good thing!
One more note...I did not go back to school. Lots of factors played into that decision. It was very hard, but after making it, a huge weight was lifted from my shoulders, so I know I did the right thing. Where do I go from here? Not sure. Right now I am delivering meals on wheels part time and we will see where God leads next.
I am linking this up to Country Girl at Home for her Pinned It Made It Monday challenge.
Sunday, August 25, 2013
BFB For Every Season
click on the photo above to read an excerpt from the book
"For Every Season" is Cindy Woodsmall's 3rd book in the Amish Vines and Orchards series. I didn't realize that this wasn't a triology and now have to wait until April before the next book comes out!
The story continues as Rhoda "sees" more of the mystery around her friends son. Rather than her boyfriend always being there when she needs him the most, it is his brother Samuel. This causes friction with her and Jacob. Jacobs life is messed up with his bosses wife and daughter. Leah is thinking of leaving the Amish faith.
So many twists and turns make this another great book. It is going to be hard to wait until April to learn what happens next. Ü
I received this book for free from WaterBrook Multnomah Publishing Group for this review.
Tuesday, August 20, 2013
Pinned It Made It Monday
...on Tuesday. Ü The 3rd Monday of the month, 2 friends and I host a ladies nite out. We have food, devotion, games/craft, etc. Last nite was our kick off and the theme was Fruit of the Spirit.
I did the meat & punch. I made Cranberry Meatballs, Ham Balls with Pineapple Glaze, Apricot Chicken Wings, and Frozen Fruit Punch.
The Cranberry Meatballs recipe I originally found in a Taste of Home magazine a few years ago and have made it several times whenever I needed to take an appetizer.
I bought frozen chicken wings I had to bake in the oven and then added the Apricot Glaze half way thru the cooking process, then put in crockpot on low until ready to serve. I LOVED this glaze and will be making it many times more to use on chicken breast, probably the ham balls and who knows what else. LOL!
1 1/2 lbs. ham
1/2 lb. fresh pork
2 eggs, slightly beaten
1/2 c. milk
3/4 c. cracker crumbs
Grind together ham and fresh pork. combine ground meat, eggs, milk, and cracker crumbs. Form into balls of desired size. Place in baking dish; cover and bake 30 minutes at 350°. Remove from oven; drain grease if necessary and add sauce. I then put this in the crockpot on low til ready to serve.
Here are some pictures of the food table:
For dessert, my friend made sugar cookies and we made our own fruit pizzas. They were a huge hit!
I did the meat & punch. I made Cranberry Meatballs, Ham Balls with Pineapple Glaze, Apricot Chicken Wings, and Frozen Fruit Punch.
The Cranberry Meatballs recipe I originally found in a Taste of Home magazine a few years ago and have made it several times whenever I needed to take an appetizer.
I bought frozen chicken wings I had to bake in the oven and then added the Apricot Glaze half way thru the cooking process, then put in crockpot on low until ready to serve. I LOVED this glaze and will be making it many times more to use on chicken breast, probably the ham balls and who knows what else. LOL!
Hamballs with Pineapple Glaze.
Here is my hamball recipe:1 1/2 lbs. ham
1/2 lb. fresh pork
2 eggs, slightly beaten
1/2 c. milk
3/4 c. cracker crumbs
Grind together ham and fresh pork. combine ground meat, eggs, milk, and cracker crumbs. Form into balls of desired size. Place in baking dish; cover and bake 30 minutes at 350°. Remove from oven; drain grease if necessary and add sauce. I then put this in the crockpot on low til ready to serve.
For dessert, my friend made sugar cookies and we made our own fruit pizzas. They were a huge hit!
This was perfect as it ended up being a very hot day.
Monday, August 19, 2013
Blog Hop with Laura Williams
We are very excited this week to be blog hopping with Paper Craft Go-To Gal Laura Williams.
I have another Inky Antics box to share with you this week. This is my favorite of all of them I have done so far.
The stamped image is colored with Irojiten Color Dictionary Pencils. The box is put together using Mono Multi Liquid Glue.
The other decorative accents were adhered using Mono Adhesive Permanent and the stamped piece was attached to the box front with Power Tabs, this raised it just a little bit.
Thank you for stopping by. Now, head on over to Melissa's blog to see the lovely that she created. Remember, the more you comment, the more chances you have to win!
The winner will be announced Friday August 23rd at 3:30 Eastern Time.
Here is the lineup for this blog hop:
Tombow Blog:
http://blog.tombowusa.com/
Melissa:
Jennie:
Marie:
Tombow Blog:
http://blog.tombowusa.com/
Tuesday, August 13, 2013
BFB What Once Was Lost
**If you are here for the Tombow/Core'dinations hop go HERE

click on the photo to read chapter one
Christina Willems works on a Kansas farm at the Brambleville Asylum for the Poor with children and adults who are poor and "displaced". After a fire, she has to find homes for each of the people in the home.
She asks Levi Johnson to take a blind boy Tommy. Levi is considered a reclusive mill owner, but the two develop a bond quickly.
Christina is faced with all kinds of challenges and begins to doubt her calling. She finds an ally in Levi as she faces her adversaries.
I have been a fan of Kim Vogel Sawyers books and this one was no exception. I highly recommend reading this book.
Mr. Bumbly's Daisy
**If you are here for the Tombow/Core'dinations hop go HERE
On the Inky Antics' blog today, we are featuring 10987MC Bumbly Bees Clear Set drawn by one of my favorite artists Tammy DeYoung.
I colored the image with Irojiten Colored Pencils and blended with Gamsol. I added flocking for the center of the flowers, plus a white gel pen to add dots to the flowers and Mr. Bumbly's cheeks. Glitter for the wings, paper pieced the overalls, and made French knots for the little swirly flowers and center of little flowers to add texture.
I even decorated the inside. I used flocking where the holes were on the cut sentiment, since I didn't want the bulk of brad on the inside of the card.
Be sure to stop by the Inky Antics' blog today to see other projects using this stamp set.
On the Inky Antics' blog today, we are featuring 10987MC Bumbly Bees Clear Set drawn by one of my favorite artists Tammy DeYoung.
I even decorated the inside. I used flocking where the holes were on the cut sentiment, since I didn't want the bulk of brad on the inside of the card.
Be sure to stop by the Inky Antics' blog today to see other projects using this stamp set.
Subscribe to:
Posts (Atom)
.jpg)

.jpg)

.jpg)


.jpg)
.jpg)
.jpg)
.jpg)
.jpg)


.jpg)


+(675x900).jpg)
.jpg)
.jpg)
.jpg)
.jpg)
.jpg)
.jpg)
.jpg)
.jpg)
.jpg)
.jpg)
.jpg)
.jpg)


.jpg)
.jpg)